Apple Pay and Google Pay stand out as two of the world’s foremost contactless payment platforms, boasting vast user bases. By integrating these payment methods into your Progressive Web App (PWA), you can streamline the checkout process for your customers, resulting in higher satisfaction rates.
Among the numerous financial infrastructure options available, Stripe is an excellent choice for effortlessly implementing Apple Pay and Google Pay. In this article, we’ll guide you through a step-by-step process of seamlessly integrating Apple Pay and Google Pay into your PWA using Stripe.
Importance of Apple Pay and Google Pay with a PWA
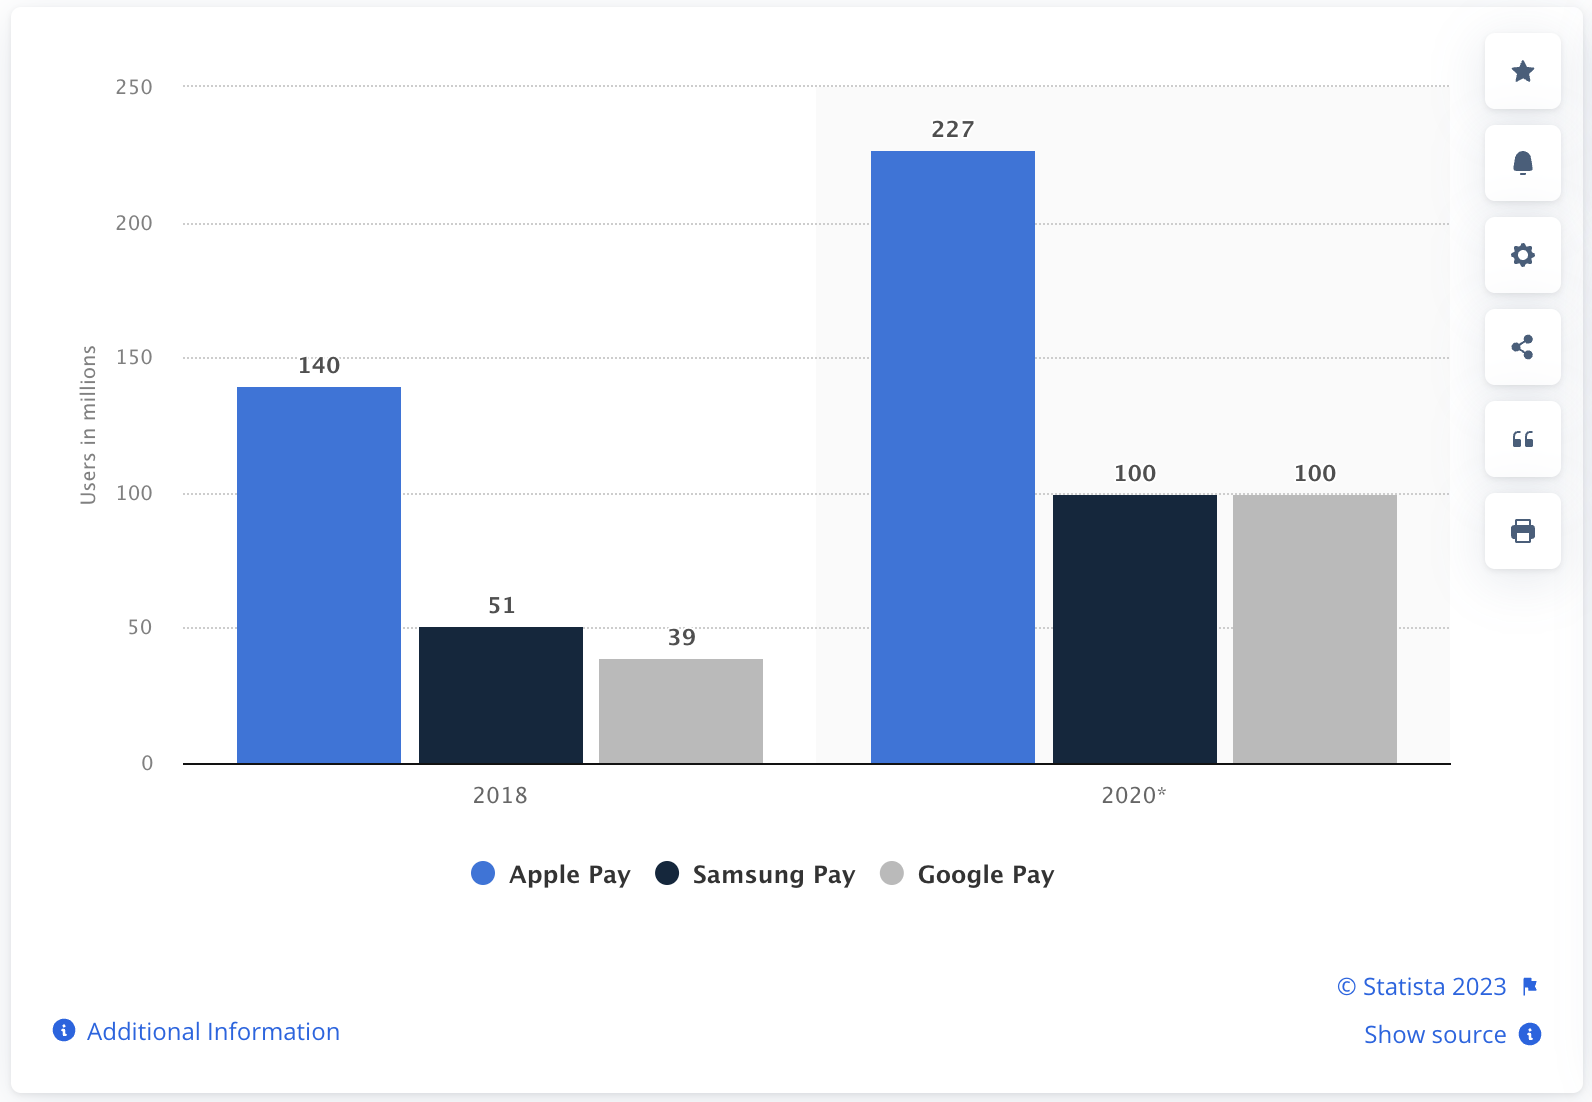
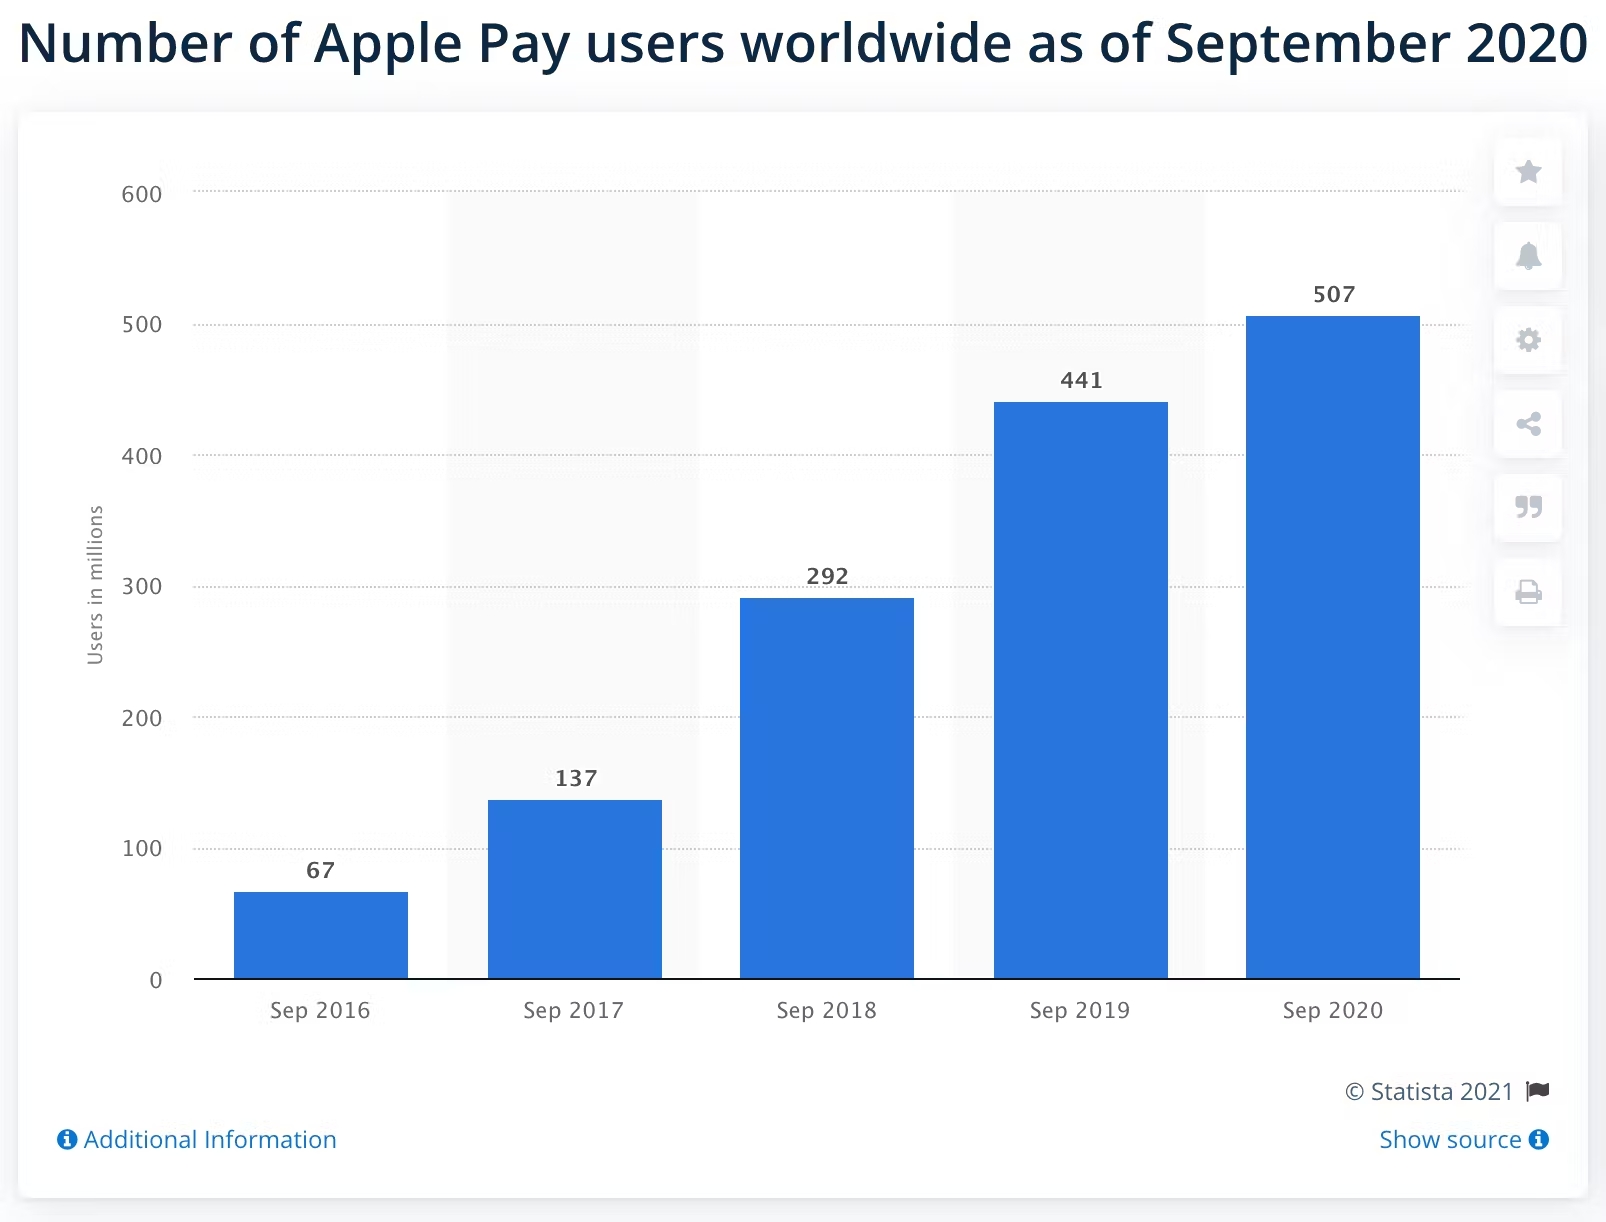
According to Statista’s 2020 data, the number of worldwide Apple Pay and Google Pay users was 507 million and 100 million, respectively, and counting. Therefore, integrating them into business platforms enhances the convenience of the payment process for a diverse customer base.


Implementing Apple Pay and Google Pay offers a wide range of benefits for both customers and businesses.
With customers, they enhance the overall payment experience with outstanding features:
- Convenience: Apple Pay and Google Pay reduce transaction time and eliminate the need to carry physical payment cards while shopping.
- Robust Security: Apple and Google, being tech industry giants, provide ironclad security for customer information, effectively minimizing the risk of data breaches and fraudulent activity.
- Versatile Payment Options: Apple Pay and Google Pay are accepted at numerous physical stores, online retailers, and for in-app purchases and in-person transactions, offering customers flexibility in their payment choices.
Cross-Platform Accessibility: Apple Pay and Google Pay cater to users across diverse mobile ecosystems, both iOS and Android.
With businesses, they contribute significantly to business success by:
- Expand into Global Markets: Accepting Apple Pay and Google Pay opens up opportunities for international customers, expanding the business’s reach beyond borders and attracting a diverse clientele without face-to-face interactions.
- Reduce costs: Streamlined payment processes effectively reduce operational costs, minimizing the need for labor-intensive manual payment handling and administrative tasks, thereby resulting in significant cost savings.
- Embrace Mobile-Centric Strategies: As mobile commerce continues to grow, having mobile-friendly payment options is essential for businesses to effectively tap into this market and cater to the preferences of mobile shoppers.
- Elevate Customer Satisfaction and Foster Loyalty: A seamless payment process heightens customer satisfaction. Satisfied customers are more likely to return, thus contributing to long-term customer retention and loyalty.
How to implement Apple Pay and Google Pay into a Magento PWA using Stripe
1. Sign up on Stripe
If you don’t have a Stripe account, visit Stripe’s website to create one. Simply sign up by providing your business details. If you already have an account, just log in to get started.
2. Create an account, set up, and get API
After signing up on Stripe, create an account, set up your business details, and obtain your API keys. These keys will be essential for integrating Stripe into your Magento PWA.

3. Install and configure the Stripe extension
Here are the steps to install and configure the Stripe extension for Magento:
- Step 1: Use Composer to install the Stripe Payments extension
- Step 2: Enable the Stripe Payments module
- Step 3: Run the upgrade script
- Step 4: Compile the code
- Step 5: Configure your Stripe API keys in the Magento admin panel at Store → Configuration → Sales → Payment Methods → Stripe and input your API keys.
composer require stripe/stripe-payments
php bin/magento module:enable StripeIntegration_Payments
php bin/magento setup:upgrade
php bin/magento setup:di:compile
4. Setup and configure Payment Methods
You can configure your payment methods according to your preferences by turning on or off payment methods. Note that payment methods will depend on your browser to display. For example, Apple Pay is supported on Safari, while Google Pay is supported on Chrome.

Due to the heightened security requirements of Apple Pay, you need to add your domain and verify ownership. After adding your domain, you are prompted to download a verification file and upload it to the PWA site so the Apple Pay system can check it.

However, PWAs do not natively support this type of file upload, you need to make some custom adjustments:
Step 1: Create a new folder to store the verification file

Step 2: Customize code in upward.yml as follows
    - matches: request.url.pathname
      pattern: '(apple-developer-merchantid-domain-association)'
      use: veniaWellKnown

veniaWellKnown:
  resolver: directory
  directory:
    resolver: inline
    inline: ''

veniaWellKnownIncludes:
  resolver: directory
  directory:
    resolver: inline
    inline: './.well-known'
5. Enable checkout by Stripe payment methods
This stage makes sure your PWA can communicate with Stripe for payments but it is a bit more technical. Let’s follow the steps below.
Firstly, implement a module to fetch payment method settings from the Magento backend
- Define the configuration variable in the di.xml file.
- Create the schema.graphqls file with some fields we allow the API to retrieve.
Secondly, customize the rest API
- Customize some functions to be compatible with the PWA cart mask ID
- Customize some functions to be compatible with the PWA address
Finally, add Tigren PWA add-ons such as:
- Install Stripe ReactJS library component: @stripe/react-stripe-js and @stripe/stripe-js
- GraphQl query for retrieving store configuration data.
- Some components that are extended from the Tigren PWA core component, with an interceptor targetable programmatically, will call some custom hook to get the payment button and insert it to some pages following configuration.
- Some stylesheets to match the current theme
Note: To provide a more intuitive view, here are some reference code snippets for you.
 <!-- Define the configuration variable in the di.xml file. -->
    <type name="Magento\StoreGraphQl\Model\Resolver\Store\StoreConfigDataProvider">
        <arguments>
            <argument name="extendedConfigData" xsi:type="array">
                <item name="payment_stripe_payments_basic_stripe_mode"
                      xsi:type="string">payment/stripe_payments_basic/stripe_mode
                </item>
                <item name="payment_stripe_payments_basic_stripe_test_pk"
                      xsi:type="string">payment/stripe_payments_basic/stripe_test_pk
                </item>
                <item name="payment_stripe_payments_basic_stripe_live_pk"
                      xsi:type="string">payment/stripe_payments_basic/stripe_live_pk
                </item>
                <item name="payment_stripe_payments_express_global_enabled"
                      xsi:type="string">payment/stripe_payments_express/global_enabled
                </item>
            </argument>
        </arguments>
    </type>
//Create the schema.grapqls file
type StoreConfig {
payment_stripe_payments_basic_stripe_mode: String @doc(description: "stripe payment mode")
payment_stripe_payments_basic_stripe_test_pk: String @doc(description: "stripe public key test mode")
payment_stripe_payments_basic_stripe_live_pk: String @doc(description: "stripe public key live mode")
payment_stripe_payments_express_global_enabled: Boolean @doc(description: "stripe wallet button status")
}//GraphQl query for retrieving store configuration data.
export const GET_STORE_CONFIG_DATA = gql`
query getStoreConfigStripe {
# eslint-disable-next-line @graphql-eslint/require-id-when-available
storeConfig {
store_code
payment_stripe_payments_basic_stripe_mode
payment_stripe_payments_basic_stripe_test_pk
payment_stripe_payments_basic_stripe_live_pk
payment_stripe_payments_express_global_enabled
}
}
`;Wrap Up
The significance of Apple Pay and Google Pay in terms of enhancing customer satisfaction and expanding global reach cannot be denied for e-businesses. By leveraging Stripe and following our comprehensive step-by-step guide for implementing these digital wallets, you can ensure improvements for your online store. However, if you encounter difficulties during the implementation process, contact us for support.

