More than a buzzword, Magento 2 landing page is a gold mine and a must if you want to improve your conversion. In this post, we will go through the process of creating high-converting landing pages quickly and without limits or technical constraints. You don’t know how to code or design? No worries. We got you back!
Contents
What Is Magento 2 Landing Page?
Definition
A landing page is a stand-alone web page designed specifically for a marketing or advertising campaign in digital marketing. It’s the page that a visitor “lands” on after clicking on an email link, an advertisement from Google, Bing, YouTube, Facebook, Instagram, Twitter, or another similar website.
Purpose of the landing page in Magento
A landing page is a highly targeted, outcome-specific digital representation of the direct marketing letter. The goal is to engage a user and persuade them to take an action by using targeted content to stimulate a wanted action.
The best option for improving the conversion rates of your marketing campaigns and reducing your cost per lead or sale is to use landing pages because of their laser-like focus.
Types of Magento 2 landing page
There are 3 ways to classify a landing page:
- Purpose: lead capture, conversion, contact, and more.
- CTA complexity: email only, detailed leads.
- Appearance: Long vs short form page.
Hubspot detailed 13 landing pages examples in the following categories:
- Squeeze Page
- Splash Page
- Lead Capture Page
- Click-Through Landing Page
- “Get Started” Landing Page
- “Unsubscribe” Landing Page
- Long-form Sales Landing Page
- Paid Advertising Landing Page
- 404 Landing Page
- “About Us” Landing Page
- “Coming Soon” Page
- Pricing Page
- “Thank You” Landing Page
Landing Page Vs Home Page Vs Product Page: What Are The Differences?
Technically, any page can be a landing page. This is the standard name in Google Analytics and Ads. However, you can’t treat all landing pages as equal. Here, we refer to a campaign-specific page with just one call-to-action and no website navigation as a “landing page.”
Now let’s make the differences between a landing page and other pages clearer.
Landing Page vs Home page
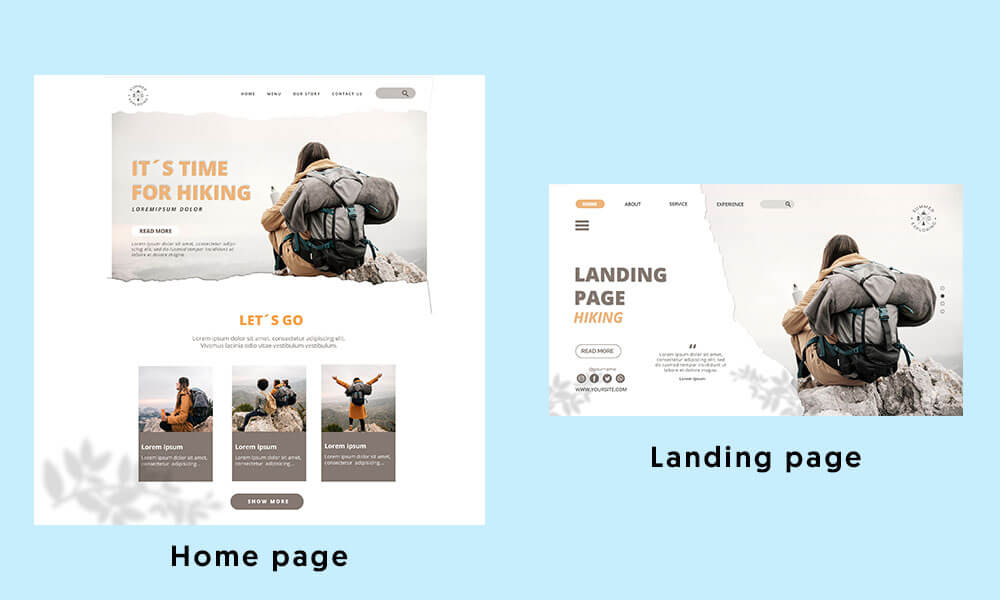
Here is an example between a landing page and a home page. The home page is a directory page with multiple “outs” for your visitors to explore. Meanwhile, the landing only has 1 link that ties to 1 CTA only.
Yes, the homepage is gorgeous. It promotes the brand, enables product exploration, and provides more details about the business and its core principles. A visitor can access anything from this point, including posting on message boards, reading press releases, reviewing the terms of service, and applying for jobs.
However, they might not actually buy anything. And that is the key idea.
This customer’s landing page has a completely different function. Everything about it works hard to convert these visitors into customers, especially when paired with slick advertisements that highlight a single offer. It is converting the traffic the brand already receives better. That is how effective landing pages are!
Landing page vs Product page
Let’s define the product page.
A product page (or webpage) serves the purpose of informing the user information, typically regarding a product and/or service. Since its goal is to appeal to the masses, the content is typically broad. It should:
- introduce your company,
- inform your audience about your product,
- and offer links to other areas of your website to aid site visitors in finding the content they are looking for.
As mentioned above, a landing page is much more laser-focused. You want to present the user with an offer they can’t refuse after they become familiar with your goods or services. The component of your marketing campaign that presents that offer to the customer directly and without any distractions is your landing page.
Why Does Your Magento Store Need Landing Pages?
We can list down a whole article on why a landing page is absolutely vital to your business’s success. But let’s keep it short and sweet (just like a good landing page should be.)
Landing pages are the best choice for improving the conversion rates of your marketing campaigns and reducing your cost per lead or sale in the shortest time.
Search engine optimization can take a very long time, and running ads or email campaigns can be expensive. By using landing pages, you’ll increase the conversion rate of your current visitors and make better use of your time and money.
Must-do Guide For A Highly-Convertable Magento 2 Landing Page
Rules of thumb: the 3-clicks rule is not golden
The 3-click rule is based on the idea that when a task calls for more than three clicks, users will likely become frustrated and give up. Although it is a straightforward method for calculating the interaction costs of significant information-seeking tasks, its apparent simplicity is also its biggest flaw.
The 3-click rule has a major flaw in that no data have been presented to date to support it in any study that has been published. A study by Joshua Porter disproved it, demonstrating that neither user dropoff nor satisfaction rises when a task requires more than three clicks. While keeping interaction costs to a minimum is crucial, the situation is more complex than just keeping track of clicks and establishing a maximum number as a general guideline.
Killer copy: The bread and butter of your landing page
Understanding the structure of a landing page and adhering to these guidelines will help you increase conversion rates. After that, you can come up with inventive and original ways to maximize your end goal for the landing page.
A unique selling proposition
The sizzle that distinguishes your good or service from the competition is your unique selling proposition. It explains the persistent query, “What makes this offer so special?” Don’t get too caught up in the idea of being “unique.” Consider your USP as the way you position your offering as distinct from the competition (and better!).
For visitors to your landing pages to understand what makes your product or service appealing, this proposition needs to be communicated succinctly.
Main headline
A good headline should perfect these 3 tasks:
- Explain what product/service you do
- Hook customers in with their biggest objection
- Secure your product as THE solution
Supporting headers
You can be more specific in the H3, and H4 headings of your landing page. Describe the product. Demonstrate how it generates the value mentioned in your title.
Here are 2 main focuses:
- It can serve as a direct continuation of the headline, completing the idea. (However, your headline ought to be able to stand alone).
- It could also add value or deliver a different, persuasive message while still being relevant to your headline.
Reinforcing statements
This one is optional.
This statement is a closing sentence that supports your USP. Here, you offer your visitor one last opportunity to convert. Make it count because this is your chance to shine and the high point of the narrative you are telling about your offer.
A compelling conclusion could add a sense of urgency or remind the visitor of their original purpose for visiting. To avoid having to scroll back up on a clickthrough page, it should also repeat your call to action.
Social proof
Social proof gives customers the value you’re promising an instant boost of credibility. So, two main functions of social proof: build trust & inspire action.
Accordingly, social proof can appear in several ways on a landing page:
- Testimonials from clients
- A case study (or links to case studies)
- Video testimonies or interviews
- Customer company logos
- Rating results from review websites like Yelp, Amazon, or Capterra
Better visual stimulation
The main image or video
You’ll discover that flowery language and arbitrary pictures of people shaking hands don’t help you very much. More importantly, you’ll discover how your customer thinks and the language you should use to persuade them.
Display your product in all its dazzling glory. The idea is to approach reality as closely as possible.
Ideally, the visual content on your landing page should depict the use context. This could be your killer app, running on a stylish contemporary device, if you’re in charge of a SaaS business. Or, if you work in e-commerce, someone might be blowing a sizable bubble of your vegan gum.
CTA button
Making the next move is simple thanks to your CTA.
Sign Up, Start Trial, and other buttons tend to emphasize action. Here are three more effective CTAs.
- Call to value: Typically, buttons that prioritize “value” over “action” perform better. The key is to deliver on the promise made in your title.
- Erase customers’ hesitation: If they don’t have time – Start *x* in 3 minutes. If price is a concern – As low as $*y* to start.
- Capture lead: To make signing up as simple as possible, pair email capture with your CTA. You can collect the rest with the email marketing follow-up.
Negative space
Negative space for white space is the region on a website used to highlight or call attention to a particular element.
Because there is nothing else nearby to look at, white space graphic design forces people to focus on specific post-click landing page components. Almost anywhere on a landing page can use some white space to help everything stand out and grab the attention of your visitor.
SEO-proof and UX UI-optimized landing page
In-depth, pertinent content that responds to a user’s inquiry about a targeted topic is the aim of SEO. This strategy aims to raise the page’s search engine ranking so that it can draw in more potential customers.
The main objective of UX is to make it as simple as possible for the user to navigate the page and find what they need. UX focuses on providing the user with a useful resource and can support conversions on the site.
To put it simply, UX is concerned with delighting the user, whereas SEO is all about making search engines happy. You must strike a balance here.
Your website’s content must be a hit with both search engines and human visitors to be successful. Keep in mind that providing thorough, pertinent content is still at the heart of SEO writing when it comes to the page’s content. But that doesn’t negate the need for it to be engaging and user-friendly.
How To Create A Landing Page Using Magento Landing Page Builder?
Making content-rich pages with unique layouts that improve your visual storytelling and increase customer engagement and loyalty is simple with Magento Landing Page Builder.
In the Adobe Commerce 2.3.1 release, the advanced tools for Page Builder were unveiled. The fundamental Page Builder features are now accessible in Magento Open Source as of the 2.4.3 release.
Here are the 7 steps you need to take to build a landing page with this supporting tool.
Step 1: Create a simple page

- Navigate to Content > Elements > Pages.
- Click Add New Page and:
- Set Enable Page to No – we don’t want the page to appear to customers yet.
- Enter Page Title
- Expand the Design section. The Layout is set Page — Full Width by default. In addition to the five standard layout options. Full-width layouts for pages, categories, and products are added by Page Builder.
- Set New Theme to Magento Luma if the sample data is available. If not, you can select another theme from the list or leave it empty to use the default theme. The page’s default theme can be replaced by a different theme by using the New Theme setting.
- Click Save.
Step 2: Create and define row
- Expand the Content section. Now you have the preview of an empty row.
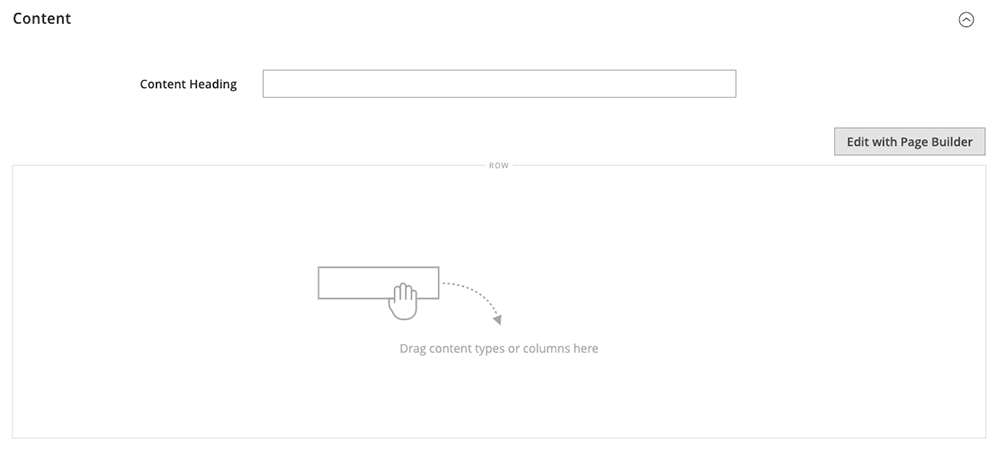
2. Choose Edit with Page Builder. The panel on the left of the expanded Page Builder workspace contains the content tools you can use to build your content in the stage.
3. Hover over an empty row to bring up the toolbox. Each content container has a toolbox that contains a similar set of options.
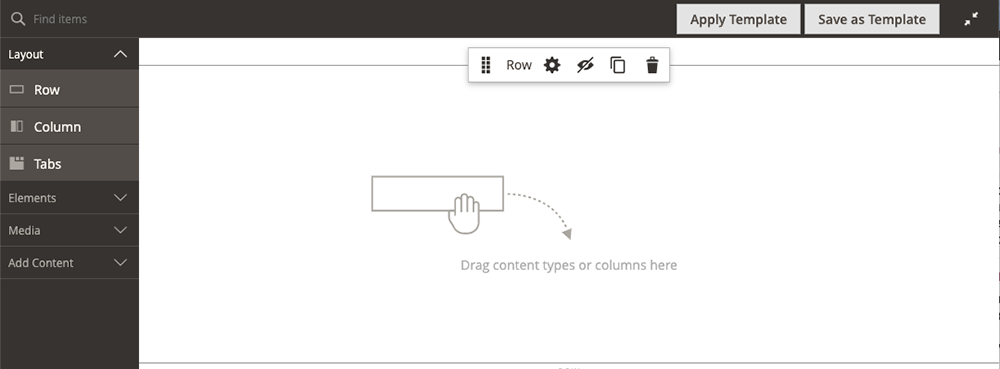
4. Click on the Settings in the Row toolbox
5. Under Appearance, click Full Bleed. Full Bleed extends the left and right borders of the row’s content area and background to the full width of the page.

6. Scroll down to the Advanced section and make sure that all Margins and Padding settings are set to 0. This option ensures that the banner spans the entire width of the row.
7. Scroll up and click Save.
Step 3: Create a banner
1. Expand Media in the Page Builder panel and drag a Banner placeholder to the stage.
2. Hover over the banner container to display the toolbox.
3. Choose the Setting icon next to the Banner toolbox and choose the Appearance you want.
4. Add the Background image.
5. Create text and apply the format for it.
6. Take note that your text is visible in the Message Text box. Text can be entered and edited either on the stage or in the banner settings’ Content section.
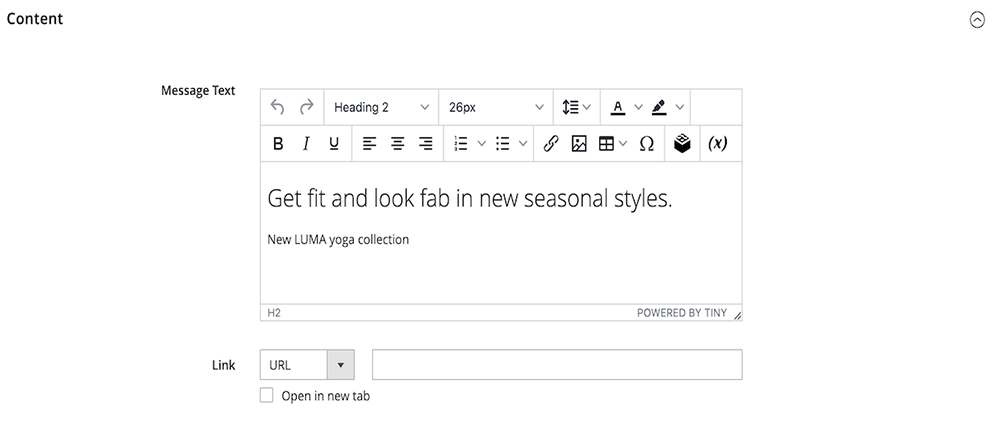
7. Set the banner link and button in the Content section:
- Set Link to Category, then Select to display the category tree.
- As the linked category, select What’s New.
- Change the Show Button setting to Always.
- Enter ‘Shop Now’ as the text that appears on the button in Button Text.
- Accept the Primary default for Button Type.
- The button format is determined by the current theme’s button style.
8. In the upper-right corner of the stage, click on Close Full Screen to return to the preview page.
9. Save and update cache in Cache Management if needed.
Step 4: Create Columns
1. Drag a Column placeholder to the top row of the stage in the Page Builder panel’s Layout section.
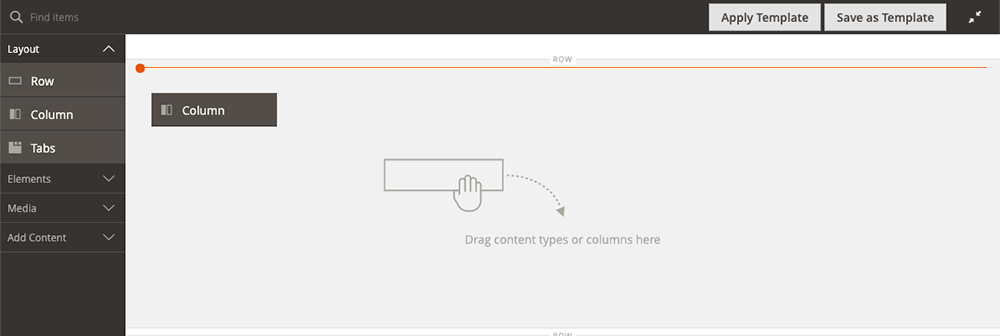
2. Hover over the first column container to bring up the toolbox, then select Settings.
3. Scroll down to the Advanced section and make sure that all Margins & Padding values are set to 0.
4. Return to the Page Builder workspace by scrolling back to the top of the page and clicking Save.
Step 5: Rearrange rows and columns
After completing all designs, the final step is to rearrange the rows to match the original Simple Page example. The first row must be moved to the bottom to match the original example, and the last row must be moved to the top.
Hold down the mouse button on the Move icon as you drag the row into position below the red guideline at the bottom of the page, ensuring that all content in the row is selected.
Step 6: SEO-proof the page
The next area in creating your page with Magento landing page builder is SEO. In the Search Engine Optimization, enter:
- The URL Key
- Meta Title
- Meta Keywords
- Meta Description.
Step 7: Choose the level of the landing page
Select a view on the Websites tab. Set the ranking of your landing page in the Hierarchy section.

Now, Save and enable your page any time you want!
This process can be time-inducing, hence, we would love to provide you with a list of helpers that make it easier for you.
Top 5 Recommended Magento 2 Landing Page Extensions
1. Mageworx Magento Landing Page Extension

The new module allows merchants to create one-of-a-kind SEO-friendly landing pages for their Magento 2 web stores. As a result, store owners now have a tool to convert more of their store visitors into customers.
Key features:
- Individualized landing pages for various marketing campaigns.
- Pages with SEO optimization.
- The Mageworx XML sitemap includes landing pages.
- Design on demand.
- Extensive landing page content conditions.
Price: $149
Best for: This Magento 2 landing page builder extension is perfect for small and medium Magento websites with beginner level.
2. Amasty Landing Pages Magento 2

The Amasty Landing Pages Magento 2 extension is a versatile and user-friendly solution, so you can start creating stunning landing pages right away. The module allows online store managers to include unique content, add custom meta tags, generate Google-friendly URLs, and much more.
Key features:
- Options for comprehensive SEO optimization
- Make separate pages to highlight special offers.
- Manage your landing pages effectively.
- Complete sitemap integration
- Landing page import/export
- Support for multiple stores
Price: $149/first year then $95/year.
Best for: Beginners in web design. More suitable for medium to large businesses.
3. Magento 2 Landing Page Extension by Magezon

Magezone’s Magento 2 Page Builder extension is a better and simpler way to create e-Commerce websites. Even if you have no coding experience, Landing Pages by Magezon provides everything you need to create personalized and high-quality web pages.
Key features:
- Pre-made templates.
- There are numerous elements.
- Cache support, developer API, and custom CSS.
- Customize layouts for each device, focusing on two fonts and an icon library.
- Highly compatible.
Price: $119
Best for: Magento merchants with newbie-level at web design. SME-friendly.
4. Buildify by Aheadworks

The module includes a convenient drag-and-drop visual editor, a library of ready-made layout templates, and a wide range of content widgets. Without any coding knowledge, you can use the module’s toolset to create various page designs from scratch or to tweak the layout of pre-configured templates.
Key features:
- 40+ ready-made templates
- 70 theme widgets for social media
- Support for custom HTML/CSS/JS
- Finder makes it simple to find widgets.
Price: $29.90/Month or $299.00/Year
Best for: Beginner-friendly with support for frontend and web design at the advanced level with custom code allowed.
5. Landing Pages by Makarovsoft

Though the demo is not currently available, we can see from the screenshot that Landing Page by Makarovsoft is simple to configure. The features are reasonably priced. Consider other Magento 2 landing page extensions on the list if you want more advanced features.
Key features:
- Improve your store’s SEO by giving each page its URL and meta information.
- Make as many landing pages as you like.
- Display product selection on cms pages or above the product category
- Increase your sales conversion rate. Allow your customers to see exactly what they desire.
- Make a unique breadcrumb structure for each landing page.
Price: $69
Best for: Building and launching a simple Magento 2 friendly landing page.
Conclusion
We hope that this post has provided you with a broad overview of the Magento 2 landing page and how you can successfully deploy one in your store. Besides the option of do-it-yourself, you can select the best-fitting extension to shorten the creating period with our recommendation.
Another way to go is to book a consultation with Tigren, our team is always ready to support your vision.

