Adobe Commerce, known to many as Magento, is not just a platform; it’s a powerhouse for online business operations, offering a range of features that cater specifically to the needs of B2B companies.
In this blog post, we’re diving into the core Magento B2B features and how they’re changing the game in e-commerce. We’ll look at everything from managing company accounts to streamlined ordering processes like requisition lists and purchase order approvals.
Whether you’re already using Adobe Commerce or just curious about what it offers, this post will shed light on its capabilities and show you how it can boost your B2B operations. So, let’s get started and see why Adobe Commerce is a top choice for businesses aiming to excel in the digital marketplace.
1. Company Accounts
Magento’s Business-to-Business (B2B) functionality is anchored in the robust Company Account component. This feature is central to the Magento B2B suite, influencing various other features and providing a foundation for a streamlined corporate buying experience.
The Company Account allows the integration of multiple buyers from a single entity into one consolidated account. This unification is pivotal in managing purchases under a corporate umbrella, significantly simplifying the procurement process.
The account setup is flexible, allowing the creation of a hierarchical structure that mirrors the company’s internal divisions and subdivisions. This structure is vital for companies to maintain coherence in their purchasing process.

From the Magento Admin panel, site administrators can configure the operational dynamics of these company accounts. This includes setting up specific B2B capabilities like payment methods, pricing levels, and negotiation tools for price quotes. The flexibility in configuration enables the creation of tailored shopping experiences, catering to the unique demands of each corporate client.
The company structure in Magento B2B can be intricately designed to reflect the business’s actual hierarchy. It starts with the company administrator and can be expanded to include various teams and divisions. This structure is essential for managing approval processes for purchase orders, ensuring that procurement adheres to company policies.
2. Company Management
Magento’s B2B suite provides powerful company management capabilities, specially designed for businesses with intricate operational models. This feature is particularly beneficial for merchant administrators overseeing B2B organizations. It simplifies the management and administration of these organizations, making it more efficient to handle complex company structures.
A pivotal aspect of company management in Magento B2B is the ability to construct a Company Hierarchy. This hierarchy mirrors the organizational structure of a business enterprise, potentially encompassing multiple subsidiary companies.
The hierarchy allows administrators to manage these companies as a unified group rather than as isolated entities. This unified approach is particularly useful for managing parent companies and their subsidiaries. The parent company administrator gains the ability to oversee and manage accounts for all subsidiary companies, centralizing control and simplifying administration.
How to Create and Manage Company Hierarchies
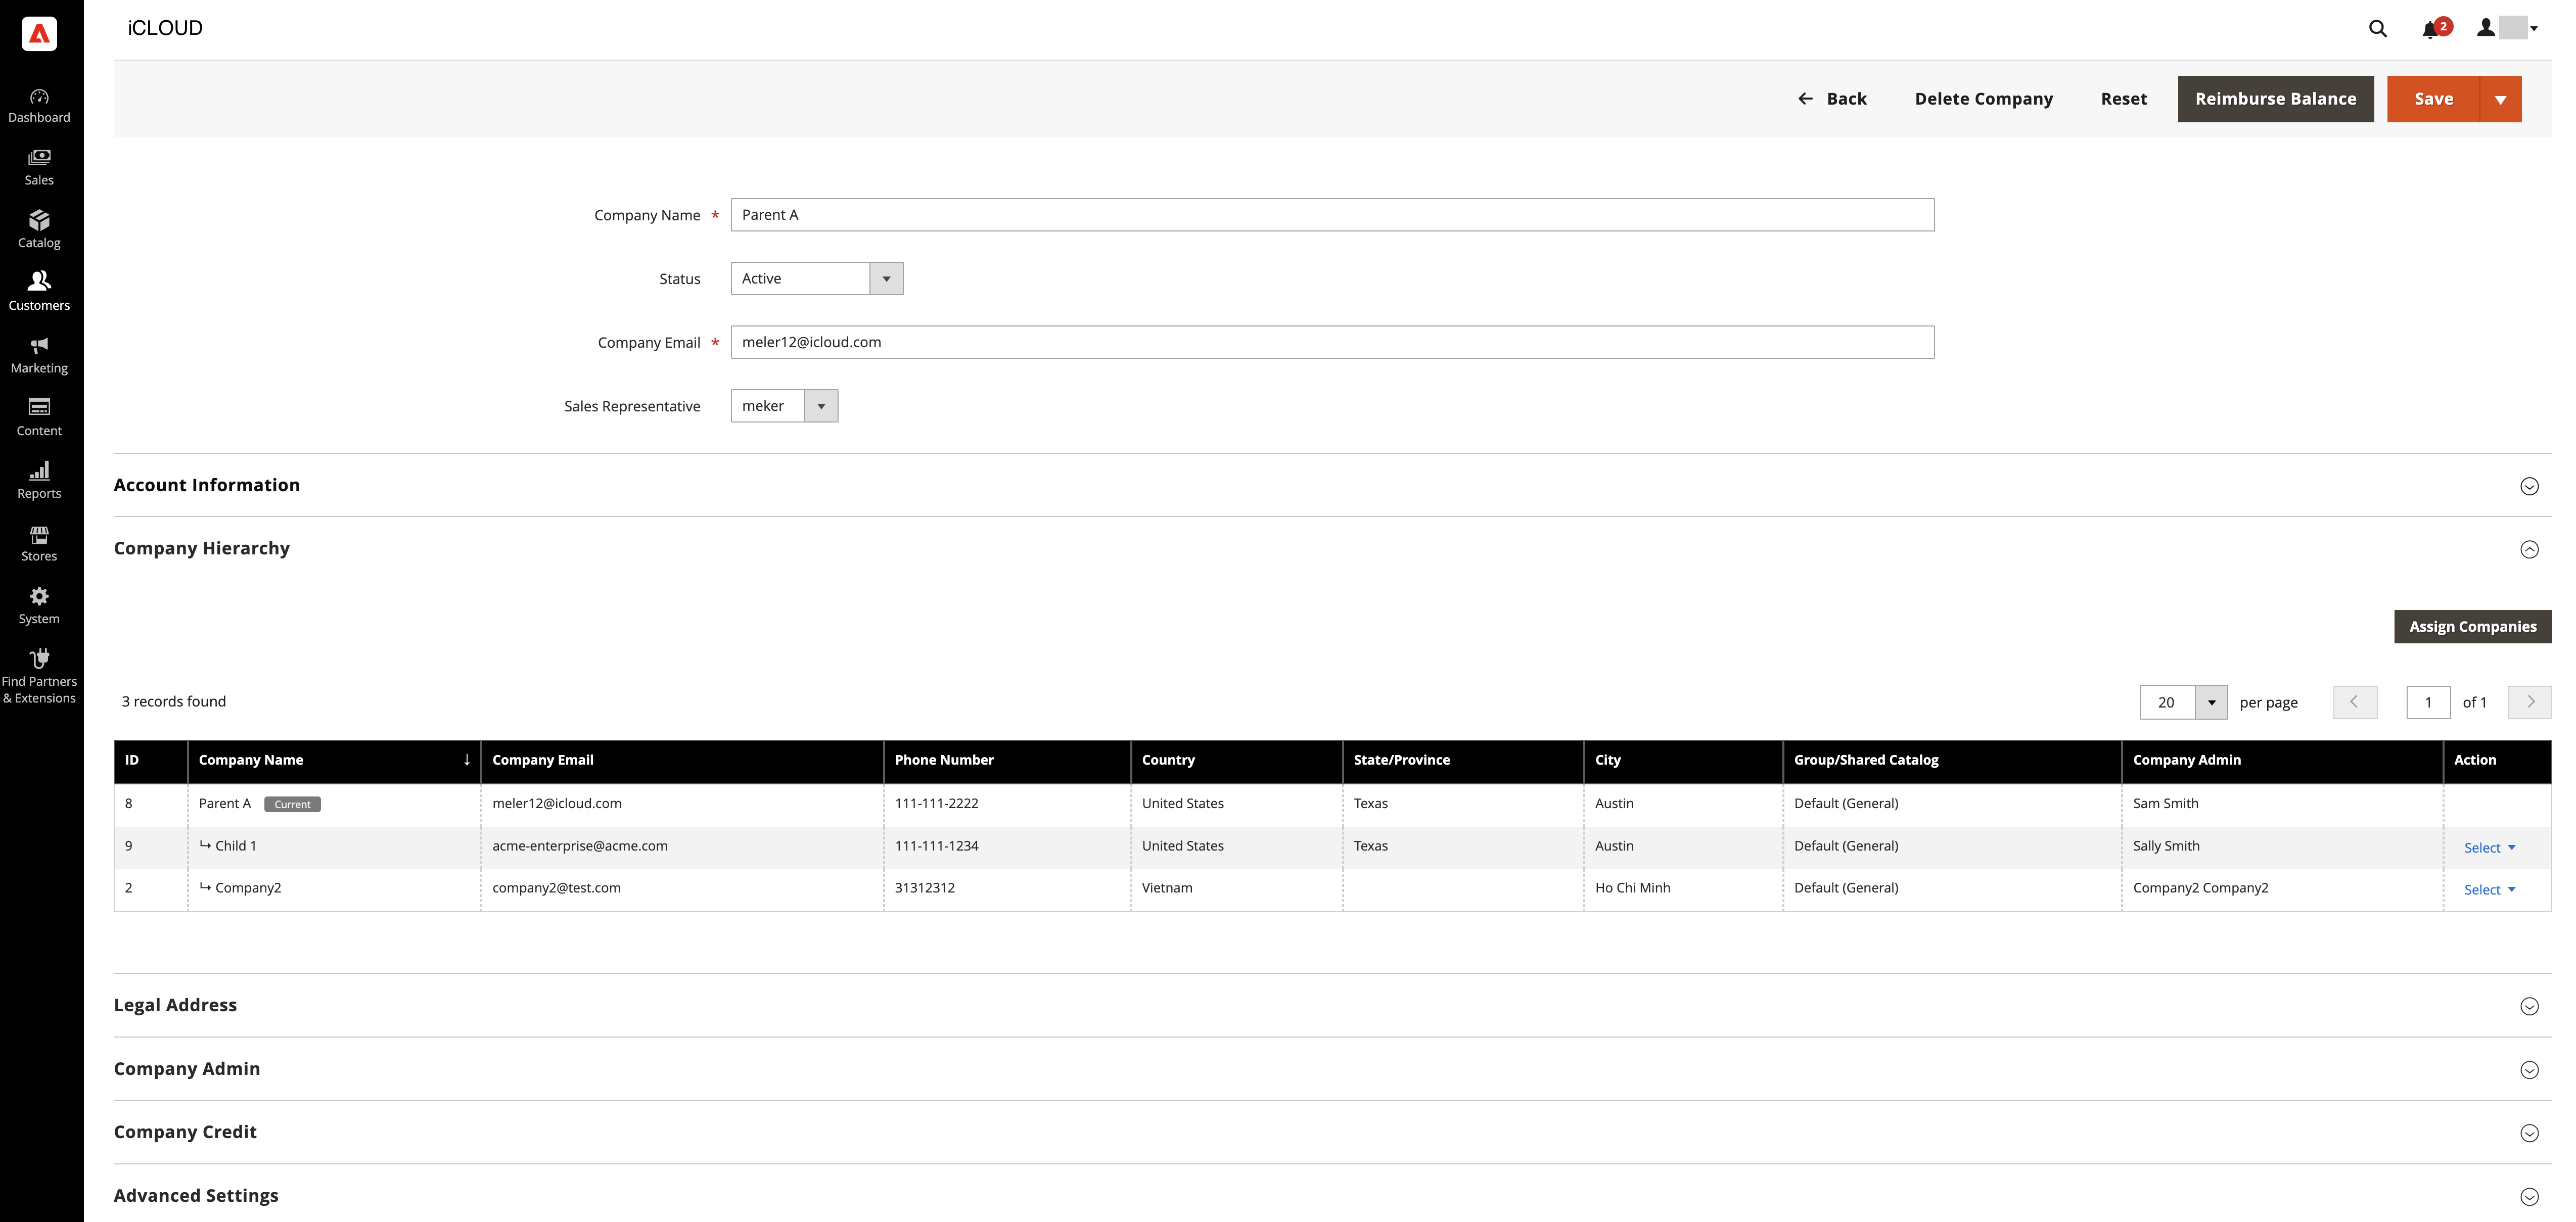
- Navigating to the Companies Grid: Administrators start by going to the Admin sidebar and selecting Customers > Companies.
- Editing Company Details: In the Companies grid, the administrator can open the company detail page for the parent company by selecting the Edit action.
- Assigning Companies to the Hierarchy: Initially, the Company Hierarchy grid is empty. Administrators can then build a parent company organization by editing the designated parent company and assigning related companies.
- Identifying Company Types: Once a company is assigned to a hierarchy, it’s identified in the Companies grid as either a Parent or Child company. Companies not part of a hierarchy are labeled as ‘Company’ and are eligible to become or be assigned to a parent company.
This grid allows administrators to see existing assignments and make changes as needed. The parent company is always prominently displayed at the top of the grid. Administrators can select individual companies or use the ‘Select All on This Page’ option for assignment to a parent company. After selecting the companies, administrators can finalize the assignment or unassignment by confirming their selection.
3. Catalog Service
Adobe Commerce’s Catalog Service is a transformative extension designed to enrich storefront experiences by providing rapid, read-only access to catalog data.
This service is crucial for administrators of Adobe Commerce, as it enhances the efficiency and responsiveness of various product-related pages, such as product detail, list, and category pages, search results, carousels, comparisons, and even cart, order, and wish list pages.
At the heart of the Catalog Service is the use of GraphQL, a lightweight query language that facilitates efficient communication between the frontend client and the backend API of Adobe Commerce. This approach is preferred for its ability to customize the content and structure of responses, enhancing the system’s performance.
Adobe Commerce utilizes two GraphQL systems: the core system covering a broad range of queries and mutations, and the services system, which is optimized for product-related queries.
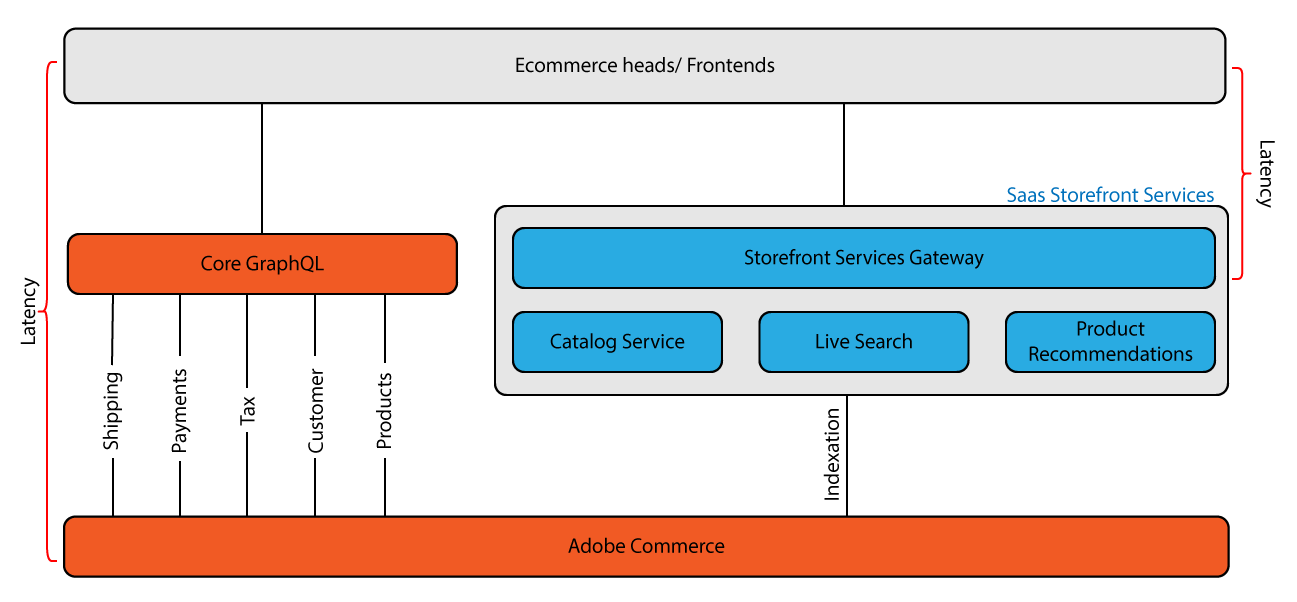
The Catalog Service functions as a Storefront Services Gateway, accessing a dedicated database containing detailed product information, including attributes, variants, prices, and categories. By bypassing direct communication with the application, it significantly reduces request and response latency, leading to faster page load times and potentially higher conversion rates.
4. Live Search
Live Search, a key feature in Adobe Commerce, revolutionizes the search experience by offering a fast, accurate, and highly intuitive search functionality at no additional cost.
Utilizing the advanced capabilities of Adobe Sensei, Live Search leverages artificial intelligence and machine-learning algorithms to analyze visitor data and combine it with your Adobe Commerce catalog, resulting in a tailored and efficient shopping experience.
Live Search replaces the standard search capabilities of Adobe Commerce. It is installed using Composer, which links the Commerce installation to the Live Search service. This integration upgrades the default search text field to a more advanced Live Search field and introduces the Product Listing Page (PLP) widget for enhanced filtering capabilities in search results.
In the Adobe Commerce Admin under SEO & Search, Live Search adds functionalities for catalog data synchronization and query service management. Once installed and configured, Adobe Commerce shares search and catalog data with the SaaS services, enabling Admin users to set up and manage search facets, synonyms, and merchandising rules.
Workflow Overview
- Installation: Live Search is deployed via Composer, connecting required modules to the service and setting up Commerce Admin configurations.
- Data Synchronization: The service indexes catalog data on Adobe’s SaaS infrastructure, from where search results are swiftly delivered to the storefront.
- Data Configuration: Essential for accurate search results, this involves assigning categories and configuring searchable and filterable attributes.
5. Product Recommendations
Adobe Commerce’s Product Recommendations, powered by Adobe Sensei, is a potent marketing tool designed to elevate customer engagement, increase conversions, and boost revenue.
By harnessing artificial intelligence and machine-learning algorithms, this feature deeply analyzes aggregated visitor data and integrates it with the Adobe Commerce catalog. The result is a personalized, relevant, and engaging shopping experience for each customer.
The installation and onboarding process of Product Recommendations in Adobe Commerce is straightforward for administrators familiar with the core Commerce configuration.
These recommendations are displayed as labeled units on the storefront, such as “Customers who viewed this product also viewed”. Administrators can easily create, manage, and deploy these recommendations across various store views from the Adobe Commerce Admin.
For storefronts using PWA Studio or custom frontend technologies like React or Vue JS, specific documentation is available to guide the integration of Product Recommendations into these headless storefronts.
6. Shared Catalogs
Shared catalogs in Adobe Commerce are essential tools for B2B commerce, offering tailored pricing levels for different customer groups or companies. This feature is exclusively available for Commerce stores that support Company accounts, allowing for the creation of custom prices per product for various companies across one or multiple websites.
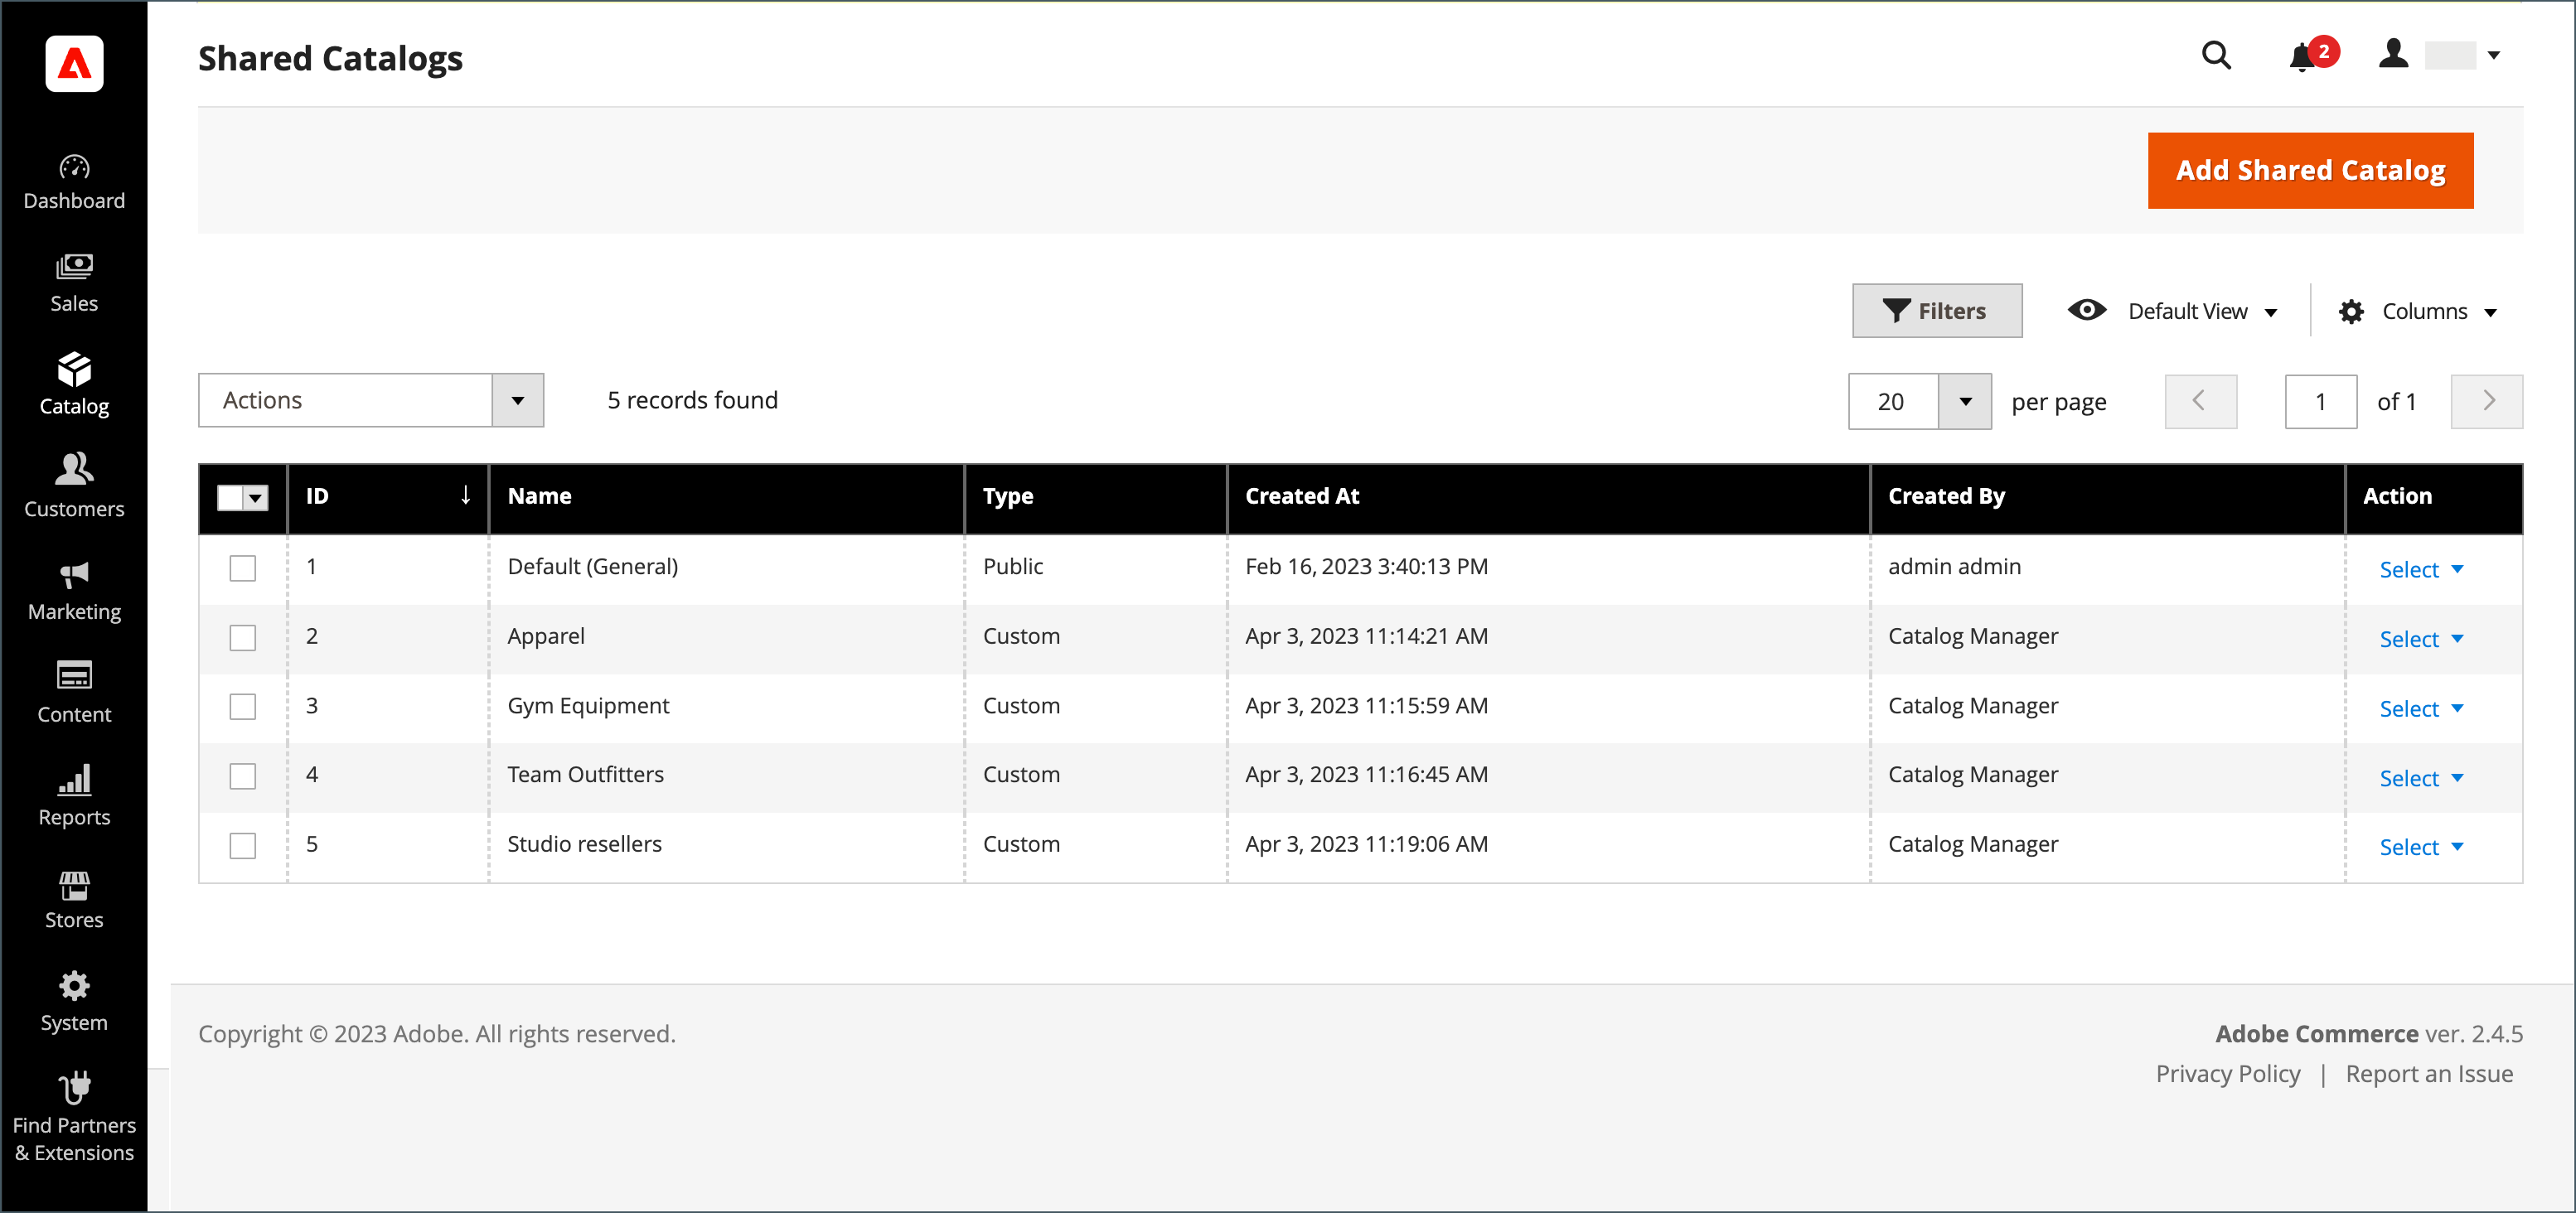
When the Shared Catalog feature is enabled, Adobe Commerce maintains both the primary product catalog and additional shared catalogs with custom pricing structures.
Although the original primary catalog remains accessible from the Admin, only the Default (General) public shared catalog is visible from the storefront. Additionally, custom catalogs can be created and made visible exclusively to members of specific company accounts.
Important Considerations
- B2B Release 1.3.0 and Later: In newer releases, when a shared catalog is created, category permissions are set to ‘Allow’ for displaying product prices and adding items to the cart for customer groups with granted access in the catalog permissions. This is a change from previous settings where permissions were automatically set to ‘Deny’.
- Impact on Group Permission Settings: It’s crucial to note that with the Shared Catalog feature enabled, all existing group permission settings for categories are overridden. The Shared Catalog exclusively manages all category permissions within the catalog.
7. Quick Order
The Quick Order feature in Adobe Commerce streamlines the ordering process for customers who are familiar with the product names or SKUs of the items they wish to purchase. This efficient functionality reduces the order process to just a few clicks, catering to both logged-in customers and guests.
To activate Quick Order in your store:
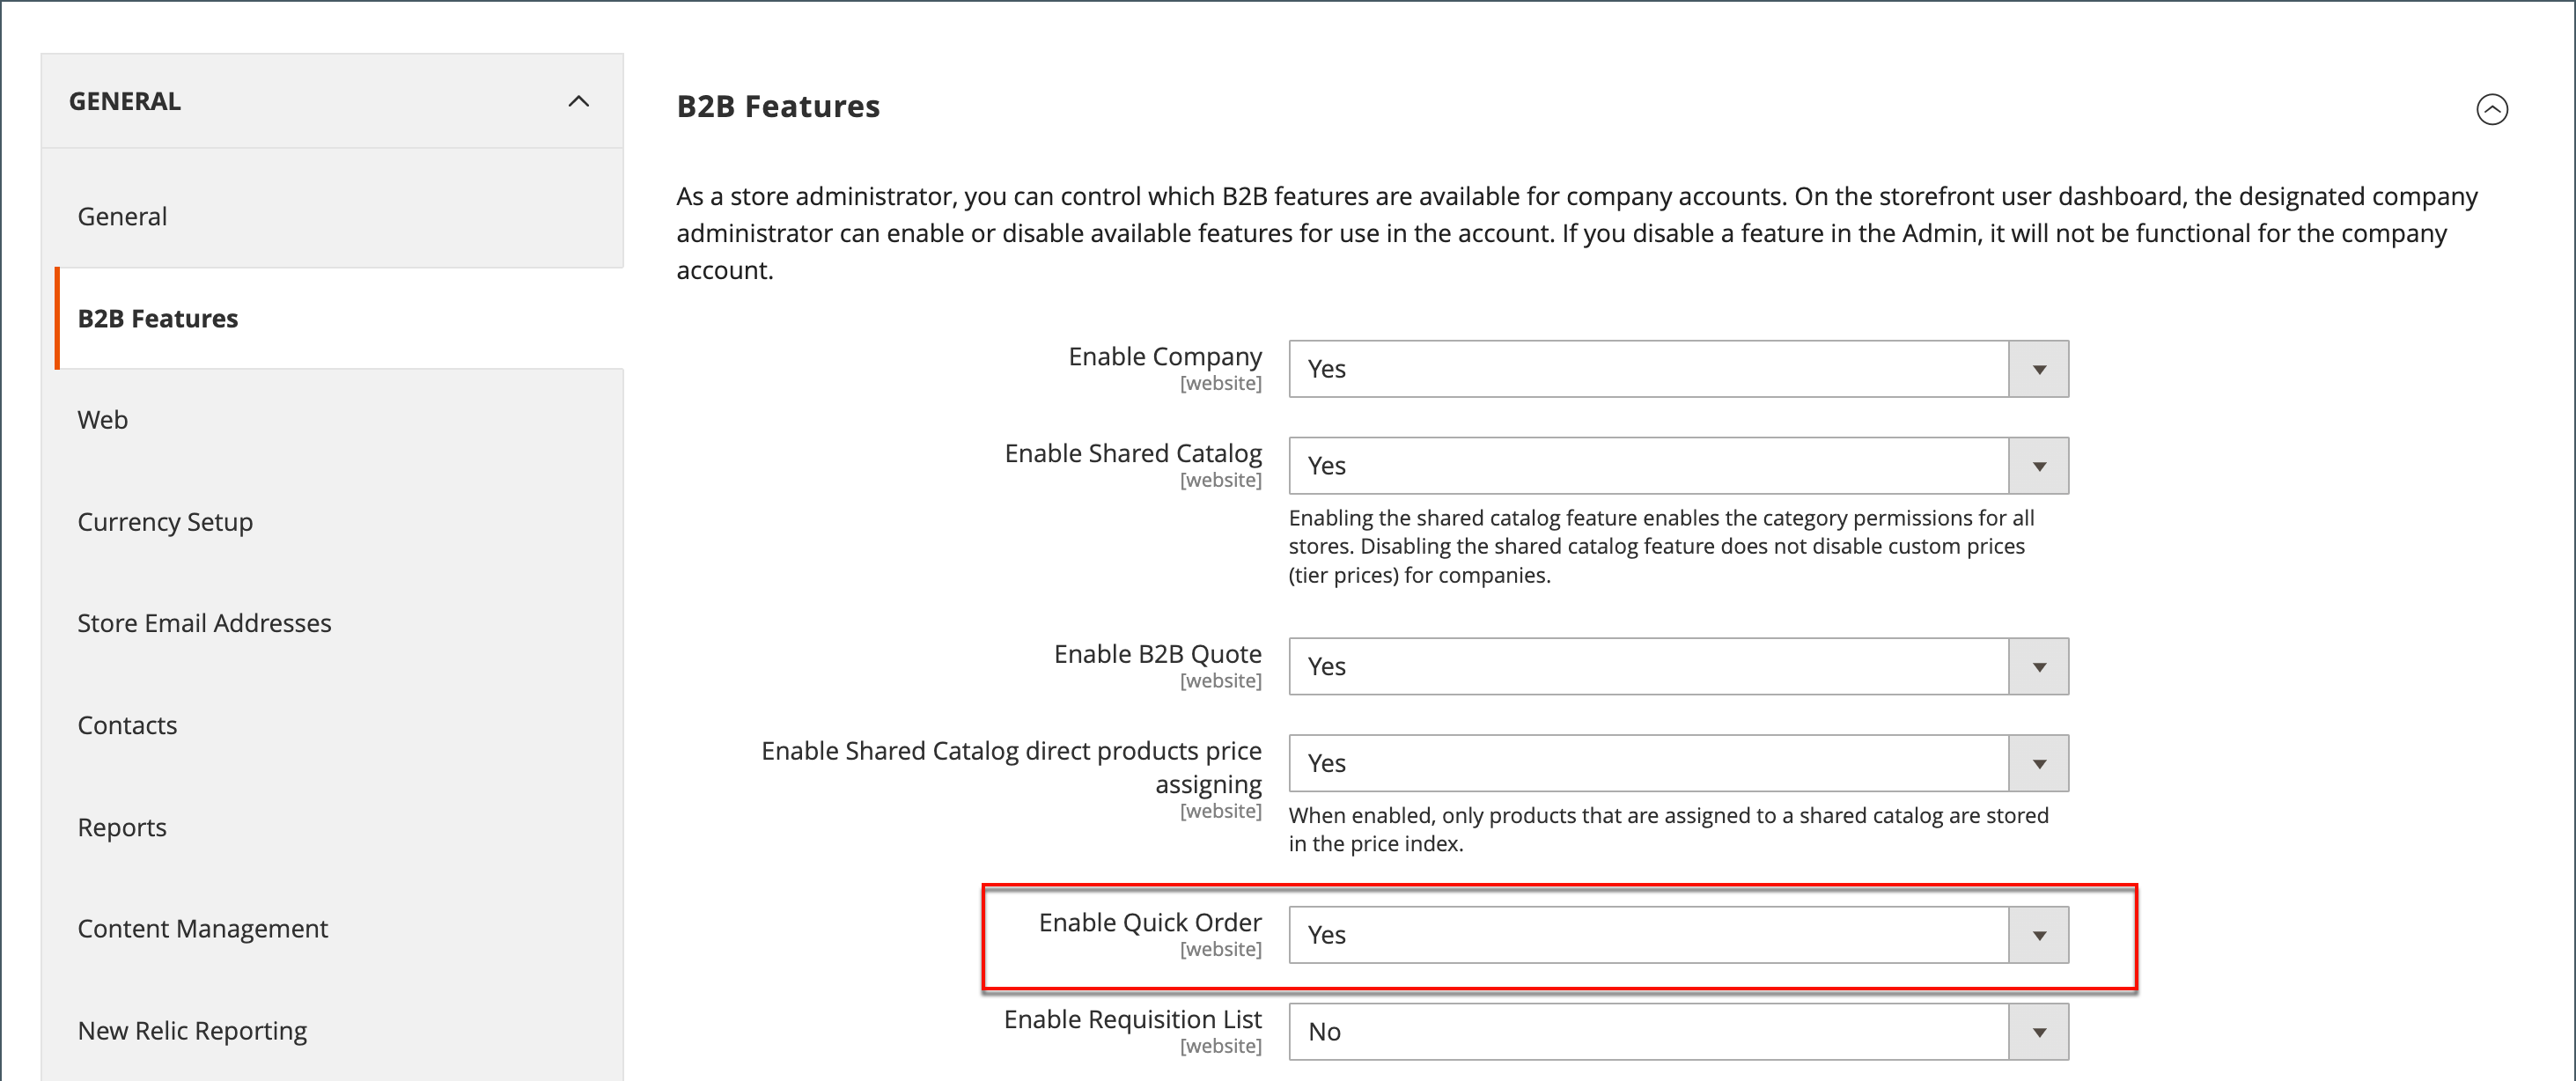
- Access Configuration: Go to Stores > Settings > Configuration in the Admin sidebar.
- Navigate to B2B Features: In the General section of the left panel, select B2B Features.
- Activate Feature: Set Enable Quick Order to ‘Yes’.
- Save and Refresh Cache: Click ‘Save Config’. When prompted, go to Cache Management and refresh any invalid caches.
Customers have several methods to specify products for quick orders:
Enter Individual Products:
- Access Quick Order: Click the Quick Order link.
- Select Product by SKU or Name:
- For SKU: Enter the SKU and click ‘Add to List’.
- For Product Name: Type the initial characters, avoid using the Enter key, select the desired product from the suggestions, and then enter the quantity.
- Repeat as needed and click ‘Add to Cart’.
Enter Multiple Products:
- In the ‘Enter Multiple SKUs’ box, input SKUs either on separate lines or on the same line separated by commas (without spaces).
- Click ‘Add to List’, enter quantities for each item, and then proceed to add them to the cart.
Upload a List of Products:
- Download a Sample Order Template from the ‘Add from File’ section.
- Open and fill out the template with product SKUs.
- Save the file and upload it by clicking ‘Choose’, then selecting the file from your system.
- Add the items from the uploaded file to the Quick Order list and click ‘Add to Cart’.
Once the quick order is created, customers can proceed through the usual checkout process. This feature significantly reduces the time and effort required for placing orders, especially for repeat purchases or bulk orders, making it an ideal solution for B2B customers who value efficiency and speed in their transactions.
8. Negotiable Quotes
Negotiable Quotes in Adobe Commerce serve as a dynamic feature for B2B transactions, enabling price negotiations between company buyers and sellers. This feature is designed to facilitate a streamlined and interactive negotiation process, from the initial quote request to the final agreement.
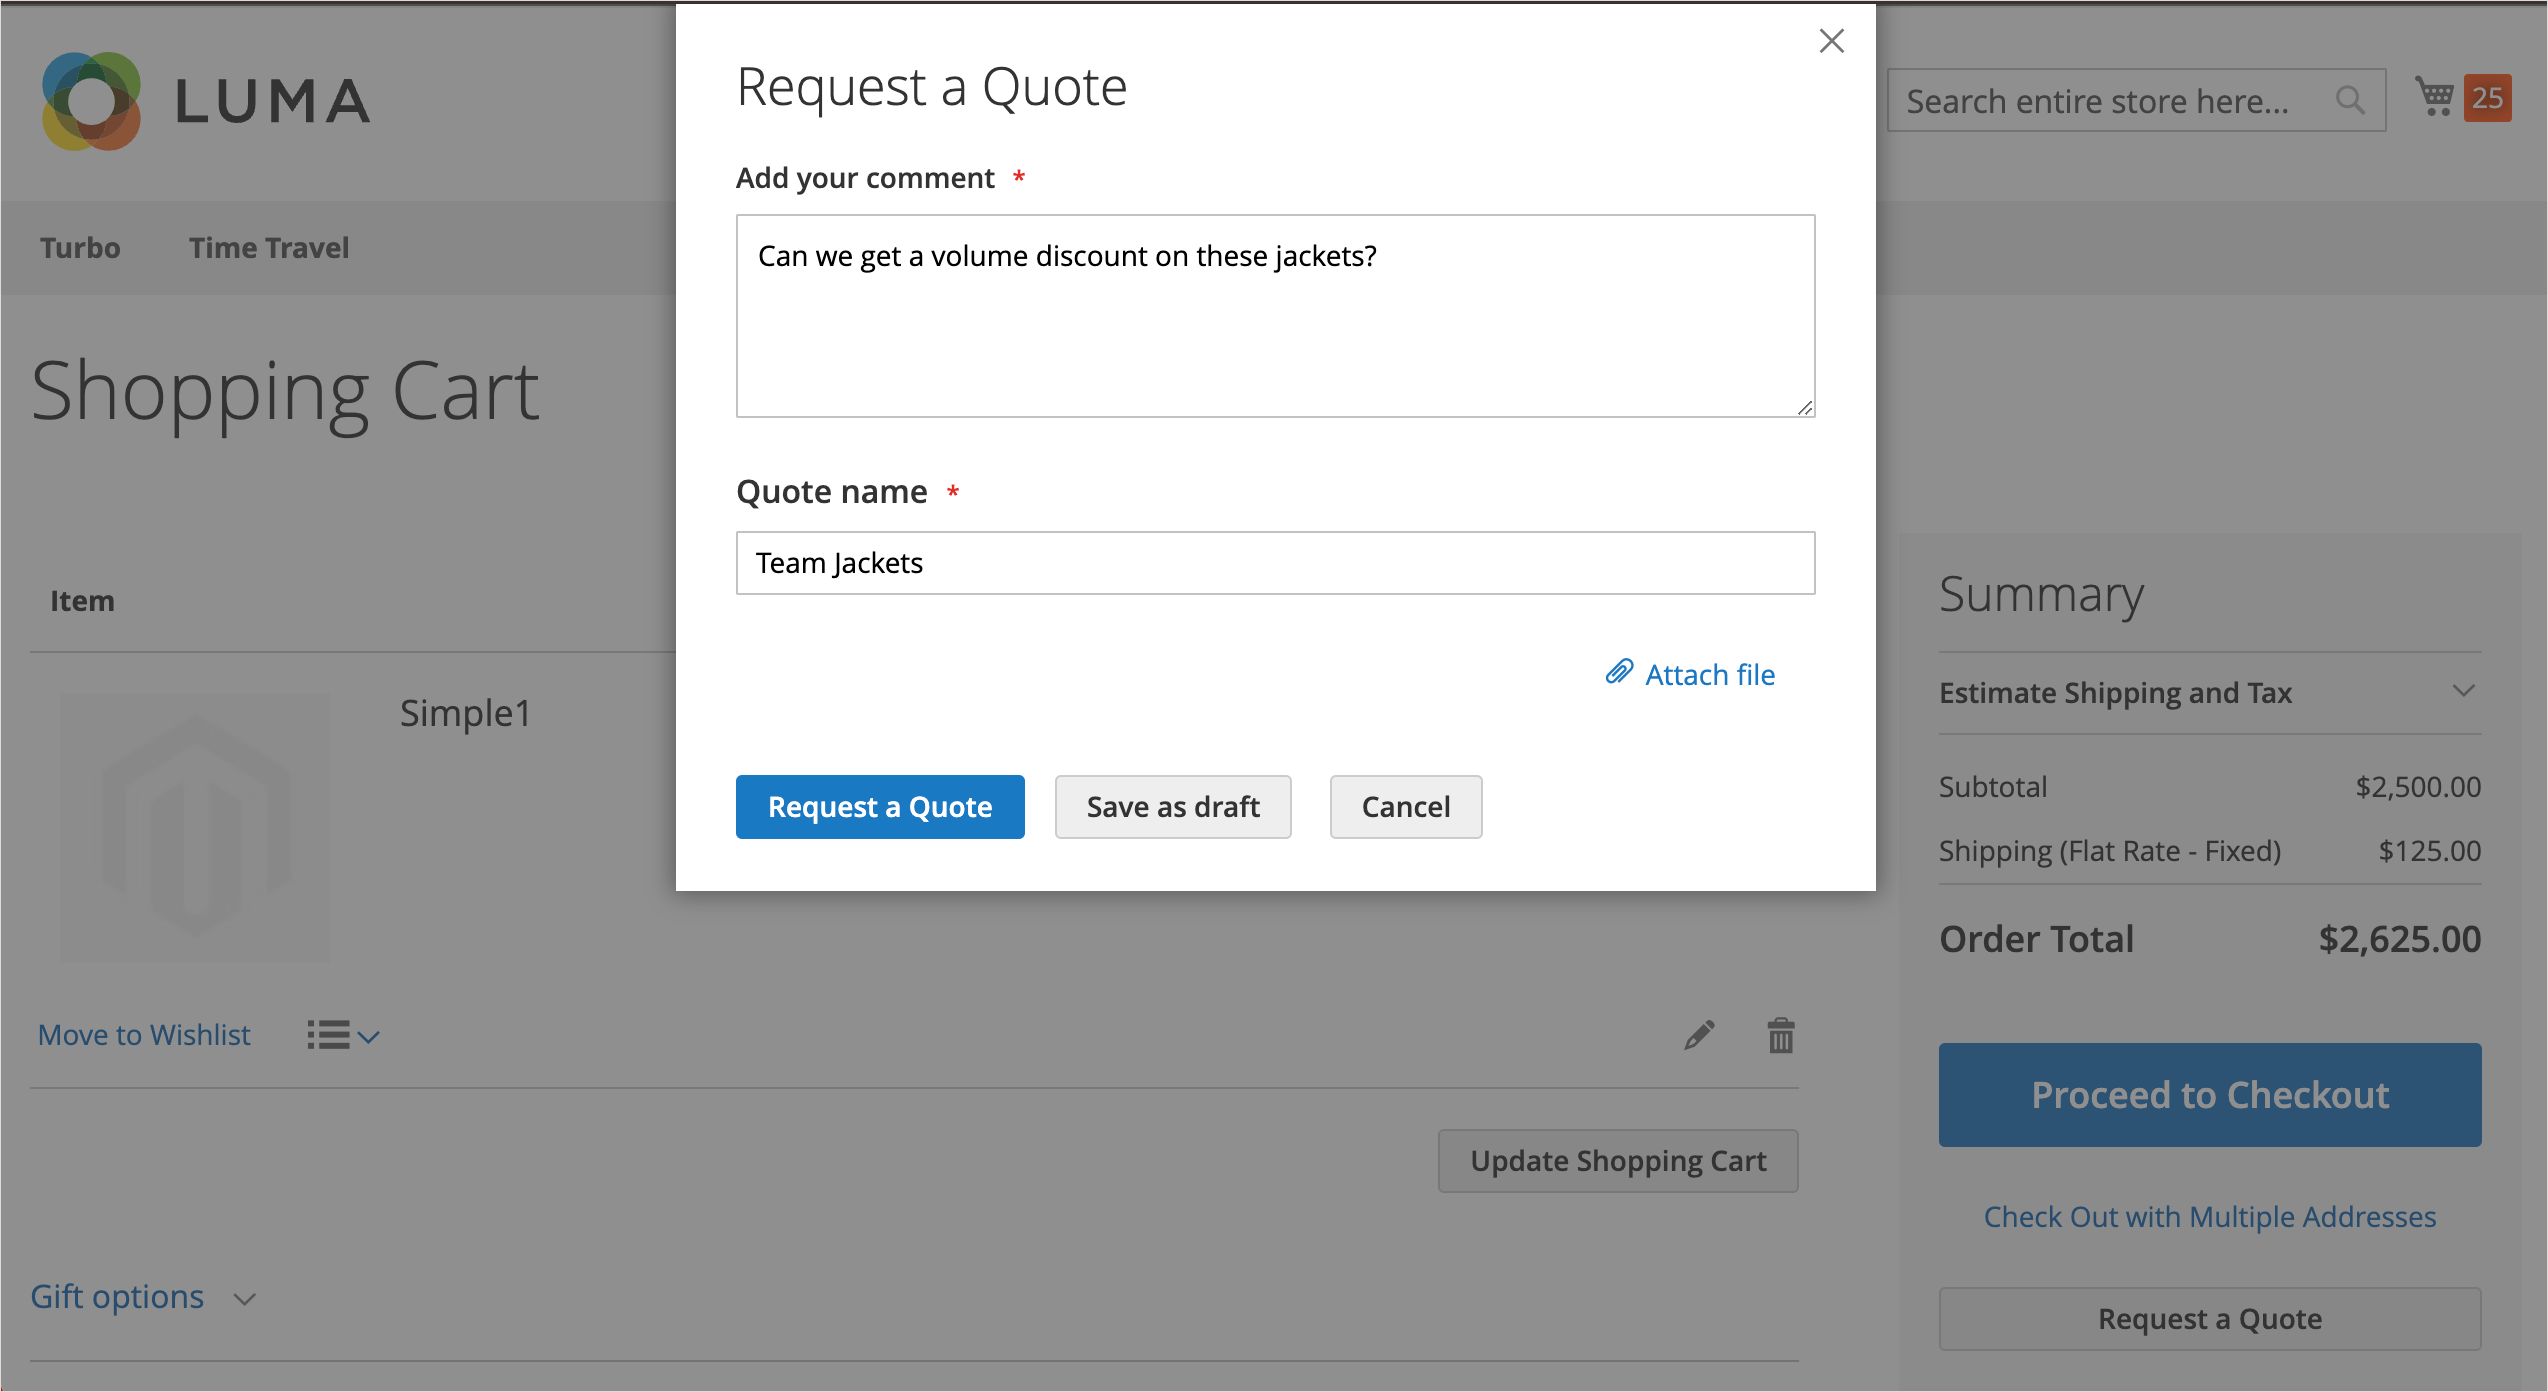
Quote Creation and Negotiation Process
1. Initiating a Quote:
- By Buyers: Buyers can request a quote from their shopping cart. This request appears in the My Quotes list on the buyer’s dashboard and is notified to the sales representative. In the Admin, it’s visible in the Quotes grid with a ‘New’ status.
- By Sellers: Sales representatives can initiate a quote on behalf of a buyer from the Admin, adding products, discounts, and notes. The quote can be saved as a draft or sent to the buyer to start negotiations.
2. Quote Review and Negotiation:
- Seller’s Response: In the Admin, the seller views the quote request, changes its status to ‘Pending’, and offers a response with discounted pricing and comments. The buyer is then notified via email.
- Buyer’s Review: The buyer can review the seller’s proposal, leave notes, and adjust the quote as needed. The negotiation continues until an agreement is reached or the seller declines the quote.
3. Finalizing the Quote:
- The buyer accepts the proposed price and proceeds to checkout. No additional discounts can be applied to the negotiated quote.
Negotiable Quotes in Adobe Commerce are a crucial aspect of the B2B commerce experience, offering flexibility and control in the pricing negotiation process. This feature enhances the buyer-seller interaction by providing a platform for dialogue and mutual agreement, ultimately leading to more customized and satisfactory business transactions.
9. Purchase Order Approvals
Purchase Orders (POs) are an integral component of B2B transactions in Adobe Commerce, especially for company accounts. They represent a systematic approach to tracking and controlling expenditure, with the capability to create, edit, and delete POs based on user permissions and hierarchical roles.
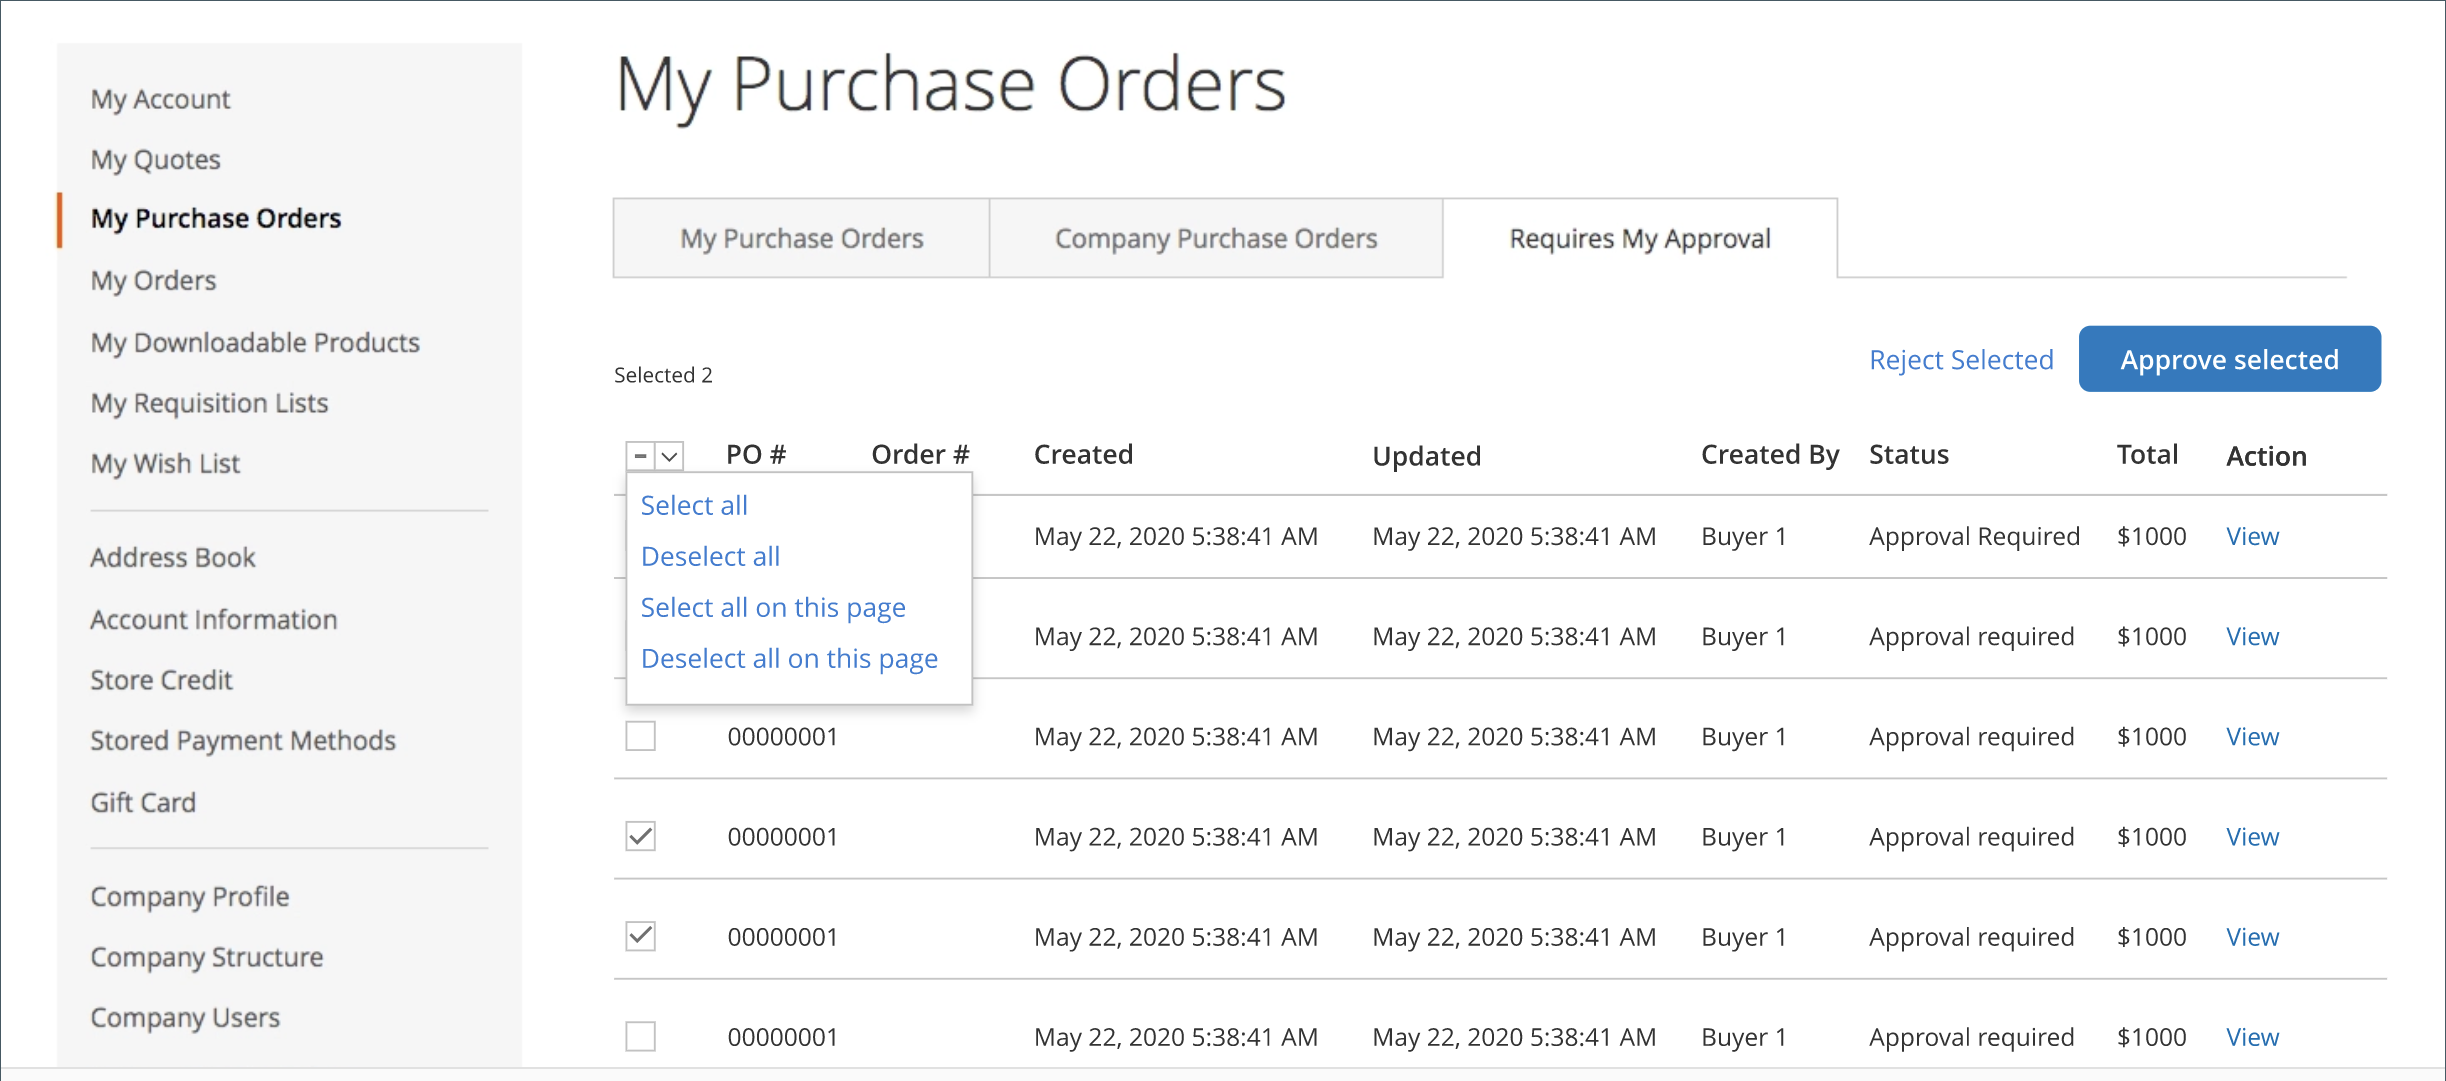
When POs are enabled, company users have access to the ‘My Purchase Orders’ section, which includes:
- Personal POs: POs created by the customer.
- Company POs: POs made by subordinate users within the company.
- Approval Required POs: For designated approvers, this tab shows POs awaiting their approval.
There are approval rules to control spending according to company guidelines. For instance, orders above a certain value might require managerial or even higher-level approval. A typical approval process might look something like this:
- User Created POs: A regular employee creates a PO which is then subject to approval by managers or higher authorities, depending on the amount or other set criteria.
- Managerial and Administrative Overrides: Managers may have more lenient approval rules, while company administrators might bypass all approval rules.
Purchase Order Approvals in Adobe Commerce offer a structured and secure way for companies to manage their spending and procurement processes. By integrating approval rules, different payment methods, and a user-specific approach to purchase orders, Adobe Commerce provides a flexible yet controlled environment for managing B2B transactions.
This system not only ensures compliance with company spending policies but also streamlines the purchase process for various user roles within a company.
10. Requisition Lists
Requisition Lists in Adobe Commerce offer a convenient and efficient solution for customers who frequently purchase the same products. This feature allows customers to create and maintain multiple lists tailored to specific needs or preferences, such as vendors, buyers, teams, or campaigns, streamlining their shopping process.
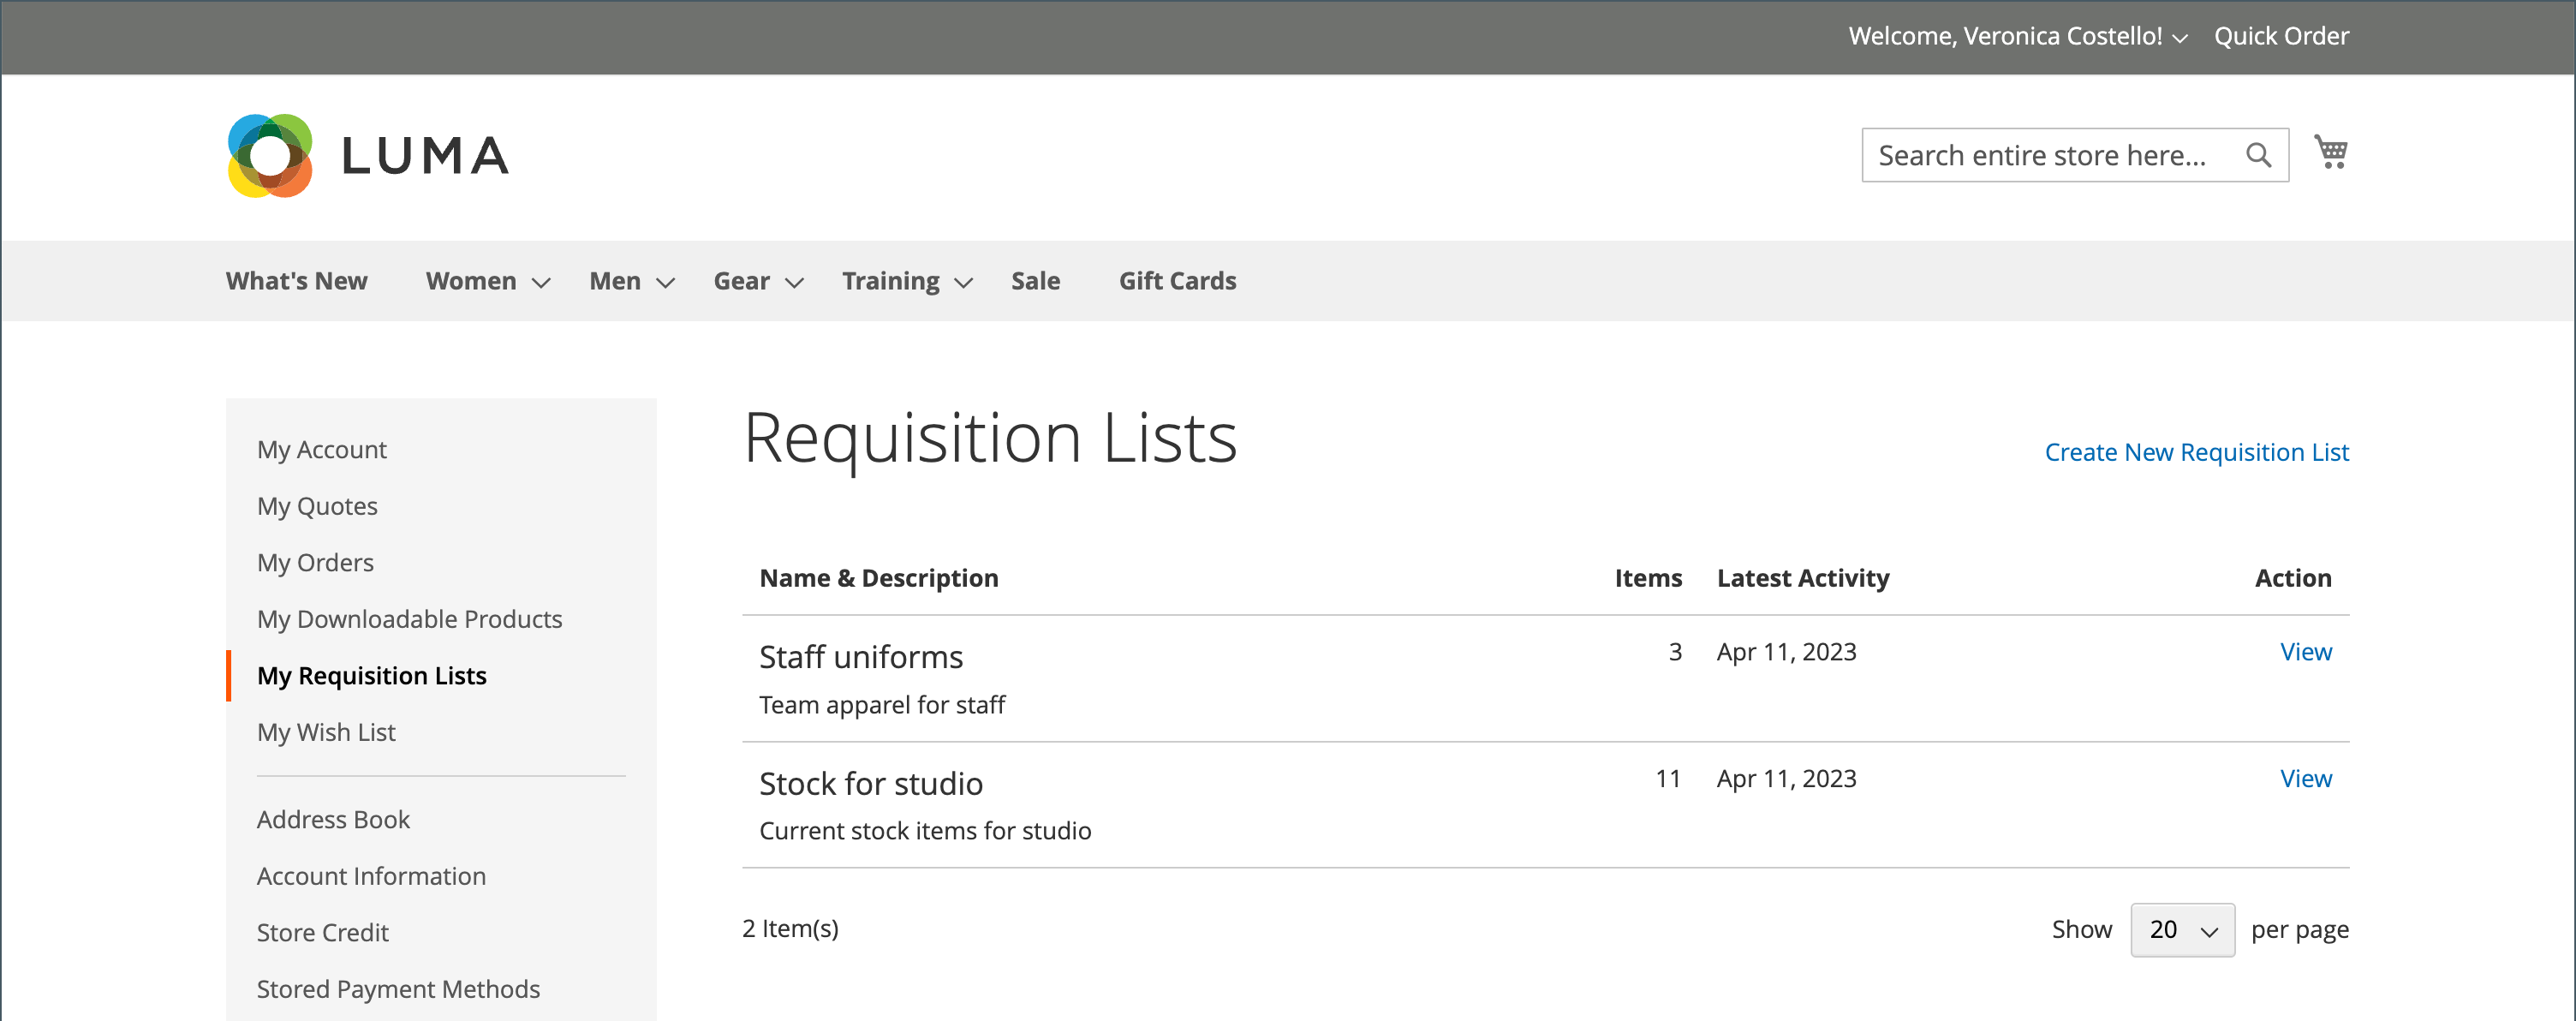
Customers can add items to their requisition lists from various locations:
- Product Pages: Select ‘Add to Requisition List’ on the product detail page.
- Catalog Pages: Hover over a product and select ‘Add to Requisition List’.
- Existing Orders: In ‘My Orders’, click ‘Add to Requisition List’ at the top of an order.
- Shopping Cart: Choose ‘Add to Requisition List’ under the item in the cart.
It’s worth mentioning that requisition lists are distinct from wish lists in Adobe Commerce. Items in requisition lists remain even after being added to the shopping cart, suitable for frequent reordering. Designed with a compact view, requisition lists are optimized for handling large numbers of items, enhancing usability and navigation.
Requisition Lists in Adobe Commerce significantly enhance the shopping experience for regular and B2B customers by simplifying the process of reordering familiar products. These lists not only save time but also provide a more organized approach to managing recurring purchases, catering to the specific needs of different customer segments and streamlining their workflow.

