

Creating new product attributes in Magento is a fundamental step in managing and organizing your online store’s product catalog. In this blog post, we will guide you through the process of creating new Magento product attributes, providing you with the knowledge and tools to enhance your store’s functionality and deliver a tailored shopping experience to your customers.
Types Of Magento Product Attributes
1. System Attributes
System attributes are default attributes provided by Magento 2, which are crucial for the proper functioning of your store. These attributes serve various purposes, including managing product information, catalog navigation, and sorting.
Here are some common examples of system attributes:
- Name: This attribute represents the product’s name, which appears on product pages and search results.
- Color: The product’s color, allowing customers to choose products of their preferred colors
- SKU: A unique identifier used to distinguish a specific product.
- Price: The product’s cost, displayed on product pages and used in calculating cart totals.
- Weight: The product’s weight, often utilized for shipping calculations.
System attributes are essential components of the Magento 2 platform and cannot be deleted.
2. Custom Attributes
Custom attributes, as the name suggests, are attributes created by store administrators to add specific product information that is not included in the default system attributes. These attributes allow you to provide additional details about your products, making it easier for shoppers to find exactly what they want.
Custom attributes can serve various purposes, such as:
- Showing unique product features that are important for your customers to know.
- Enabling product comparisons based on size, color, or other relevant criteria.
- Providing additional filtering options.
In Magento 2, product attributes play a vital role in managing and presenting your product information. System attributes provide the necessary foundation for the platform’s functionality, while custom attributes allow you to add unique details to meet your specific business needs. By utilizing both types of attributes effectively, you can create an enhanced shopping experience for your customers, improve product discoverability, and ultimately drive more sales to your Magento 2 online store.
Creating Custom Product Attributes In Magento 2
There are 5 simple steps to create a new product attribute in Magento 2.
Step 1: Admin panel => STORES => Product => Add New Attribute
Go to the admin panel, tap STORES, choose Product in the Attribute section and click on the Add New Attribute button

Step 2: Complete the Properties Information
- Attribute Properties:
First, you must add the Default Label (attribute name), then select its input type which depends on the attribute you want to create. For example, here I will create the Flavor attribute so I will choose its catalog input type as Dropdown.
Second, if you want to ask the buyers to select a product option before purchasing it, you must set “Yes” in the Values Required field and vice versa.
Thirdly, in terms of Manage Options, click on the Add Option button and create different values for your new attribute. Also, check on the box presenting the option that you want to make it default.

Note: There are various attribute properties available in this form. These properties define how the attribute is displayed and interacted with on the front end of your online store.
Default Label: The default label is the name used to identify the attribute. It helps you differentiate and recognize the attribute when working with your product data.
Catalog Input Type: The catalog input type determines the type of data that can be entered in the attribute field. Magento offers a range of catalog input types to choose from:
- Text Field: A single-line field to enter text, suitable for attributes like name or SKU.
- Text Area: A multi-line field for entering larger amounts of text data, commonly used for descriptions or explanations.
- Text Editor: Allows you to add a WYSIWYG Editor to any custom field, providing rich text editing capabilities.
- Date: Enables the selection of a date and time from a calendar or direct input into the field.
- Yes/No: Presents a switch-like button with pre-defined options of Yes or No.
- Dropdown: Provides a drop-down list to choose a single option at a time.
- Multiple Select: Allows the creation of fields where multiple options can be selected simultaneously.
- Media Image: Adds an additional image type, such as Base, Small, and Thumbnail images, expanding the visual representation of the product.
- Fixed Product Tax: Used to define fixed amounts of money as taxes based on specific locale requirements.
- Visual Swatch: Specifically designed for configurable products, it shows corresponding images per swatch (e.g., color, pattern, or texture).
- Text Swatch: Similar to visual swatch, but displays the text for an attribute when the image is not available.
2. Advanced Attribute Properties
Add Attribute Code: The attribute code is a unique identifier used to manage the attribute within the system. It is mainly used for internal purposes, such as searching, importing/exporting, and retrieving attribute information programmatically.
Set The Scope: The scope property determines how the attribute value is displayed and edited in different levels of your Magento 2 setup. There are three scope options available:
- Global: The attribute value is shared across all websites and store views in your Magento installation. Changes made to the attribute value in one place will be reflected everywhere.
- Website: The attribute value can vary per website but remains the same across multiple store views under that website. This is useful when you have multiple websites within your Magento setup.
- Store View: The attribute value can be tailored for each individual store view, primarily based on different languages. This allows you to provide localized attribute values for a better customer experience.

Choose Yes In Unique Value: By setting the Unique Value property to “Yes,” you can prevent the creation of duplicate attribute values.
Input Validation (Applicable for Text Input Type): For attributes with the Text input type, you can further refine the data entered by applying input validation. The available options for input validation include:
- Integer Number: Restricts input to whole numbers.
- Decimal Number: Allows decimal values.
- Email: Validates that the input follows the email format.
- URL: Validates that the input follows the URL format.
- Letters or Numbers: Allows only alphabetic characters or numeric digits.
These validation options help ensure data integrity and consistency when collecting information for the attribute.
Step 3: Enter the Labels/ Titles for the attribute
Click on the “Manage Labels” tab. The label helps identify the attribute in Admin and the storefront of each store view. In case your Magento store is presented in multiple languages, please enter the translated title(s) for each view of the store.

Step 4: Manage Storefront Properties
Select Yes if you want your new attribute to appear in Search/ Advanced Search/ Product Comparison/ Layered Navigation/ Price Rules/…
Use in Layered Navigation: Customers can use this filter to refine their product search within specific attribute values.
Use in Search Results Layered Navigation: Enabling this option allows the attribute to be used as a filter in the layered navigation on search results pages. Customers can further refine their search results using this attribute filter.
Visible on Catalog Pages on Storefront: Enabling this ensures that the attribute is displayed on product listing pages in the catalog.
Used in Product Listing: This setting allows the attribute to be used for sorting and filtering products in the product listing pages.
Used for Sorting in Product Listing: Enabling this option makes the attribute available as a sorting option for product listing pages.
Use for Promo Rule Conditions: Enabling this option allows you to use the attribute in promotional rule conditions for catalog price rules. This can be useful when creating specific promotions based on attribute values.
Once you have configured the desired storefront properties for your attribute, click the “Save Attribute” button to create the new custom product attribute with the specified settings.

Step 5: Save The Attribute
Finally, save the attribute you have created and check to see whether it is displayed appropriately on the front end.
Organizing Magento Attribute Sets
In Magento, attribute sets play a crucial role in organizing and managing product attributes effectively. By grouping related attributes, you can streamline your product management process and ensure consistency across similar product types. In this section, we will explore how to create and organize attribute sets in Magento for optimal efficiency.
Step 1: Creating a New Attribute Set
To create a new attribute set, follow these steps:
- Navigate to “Stores” > “Attributes” > “Attribute Set” in the Magento admin panel.
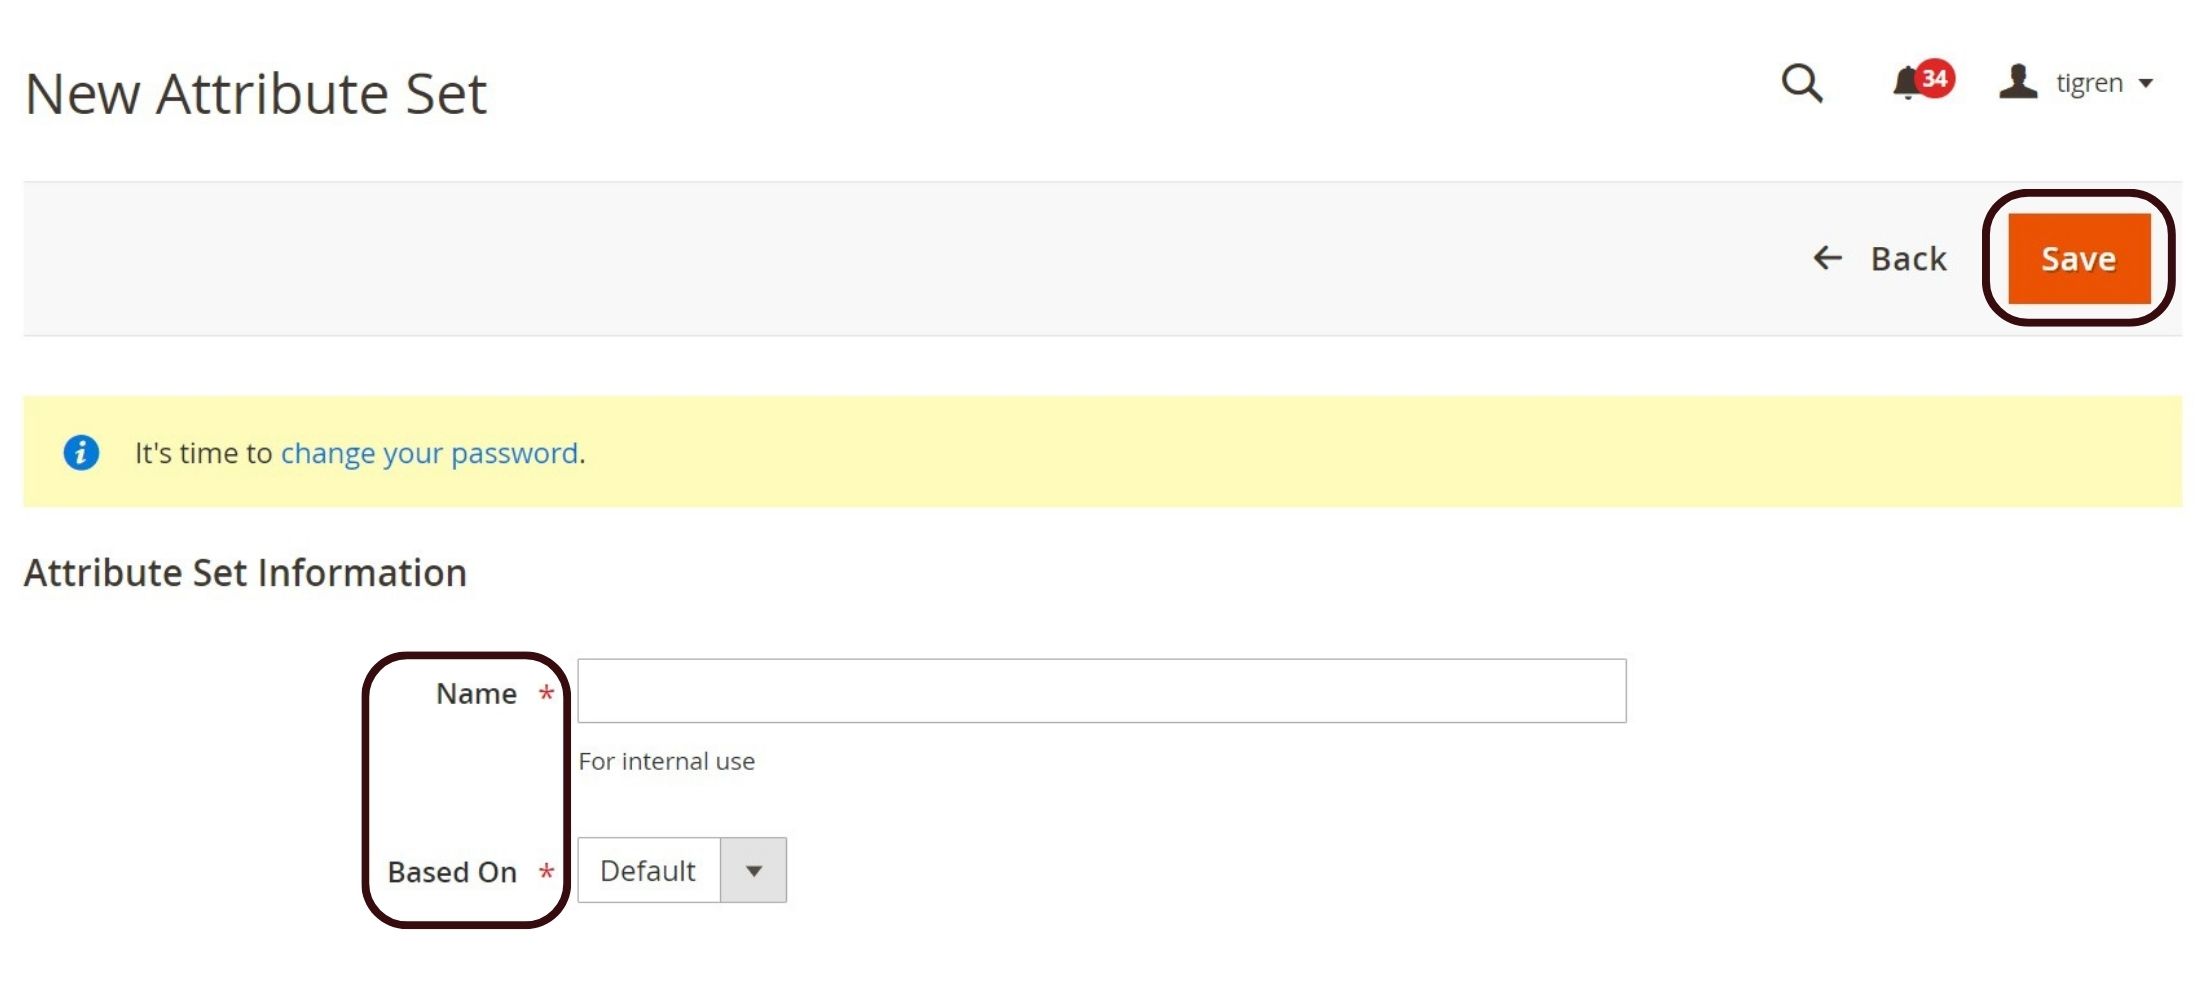
- Click on the “Add Attribute Set” button in the top-right corner.

- Provide a unique name for the attribute set in the “Name” field.
- Choose an existing attribute set from the “Based On” dropdown menu to use as a template for the new attribute set. This option allows you to copy attributes and groups from the selected template set.
- Click the “Save” button to create the new attribute set.
Step 2: Manage Your Magento Attribute Set
- Navigate to “Stores” > “Attributes” > “Attribute Set” in the Magento admin panel. Click on the attribute set you want to edit.
- On the “Edit Attribute Set” page, you will see the “Groups” section, which contains various attribute groups.
- You can create new groups by clicking the “Add New” button and entering a name for the group.
- To add attributes to a group, click the “Unassigned Attributes” section, which displays a list of attributes not currently assigned to any group.
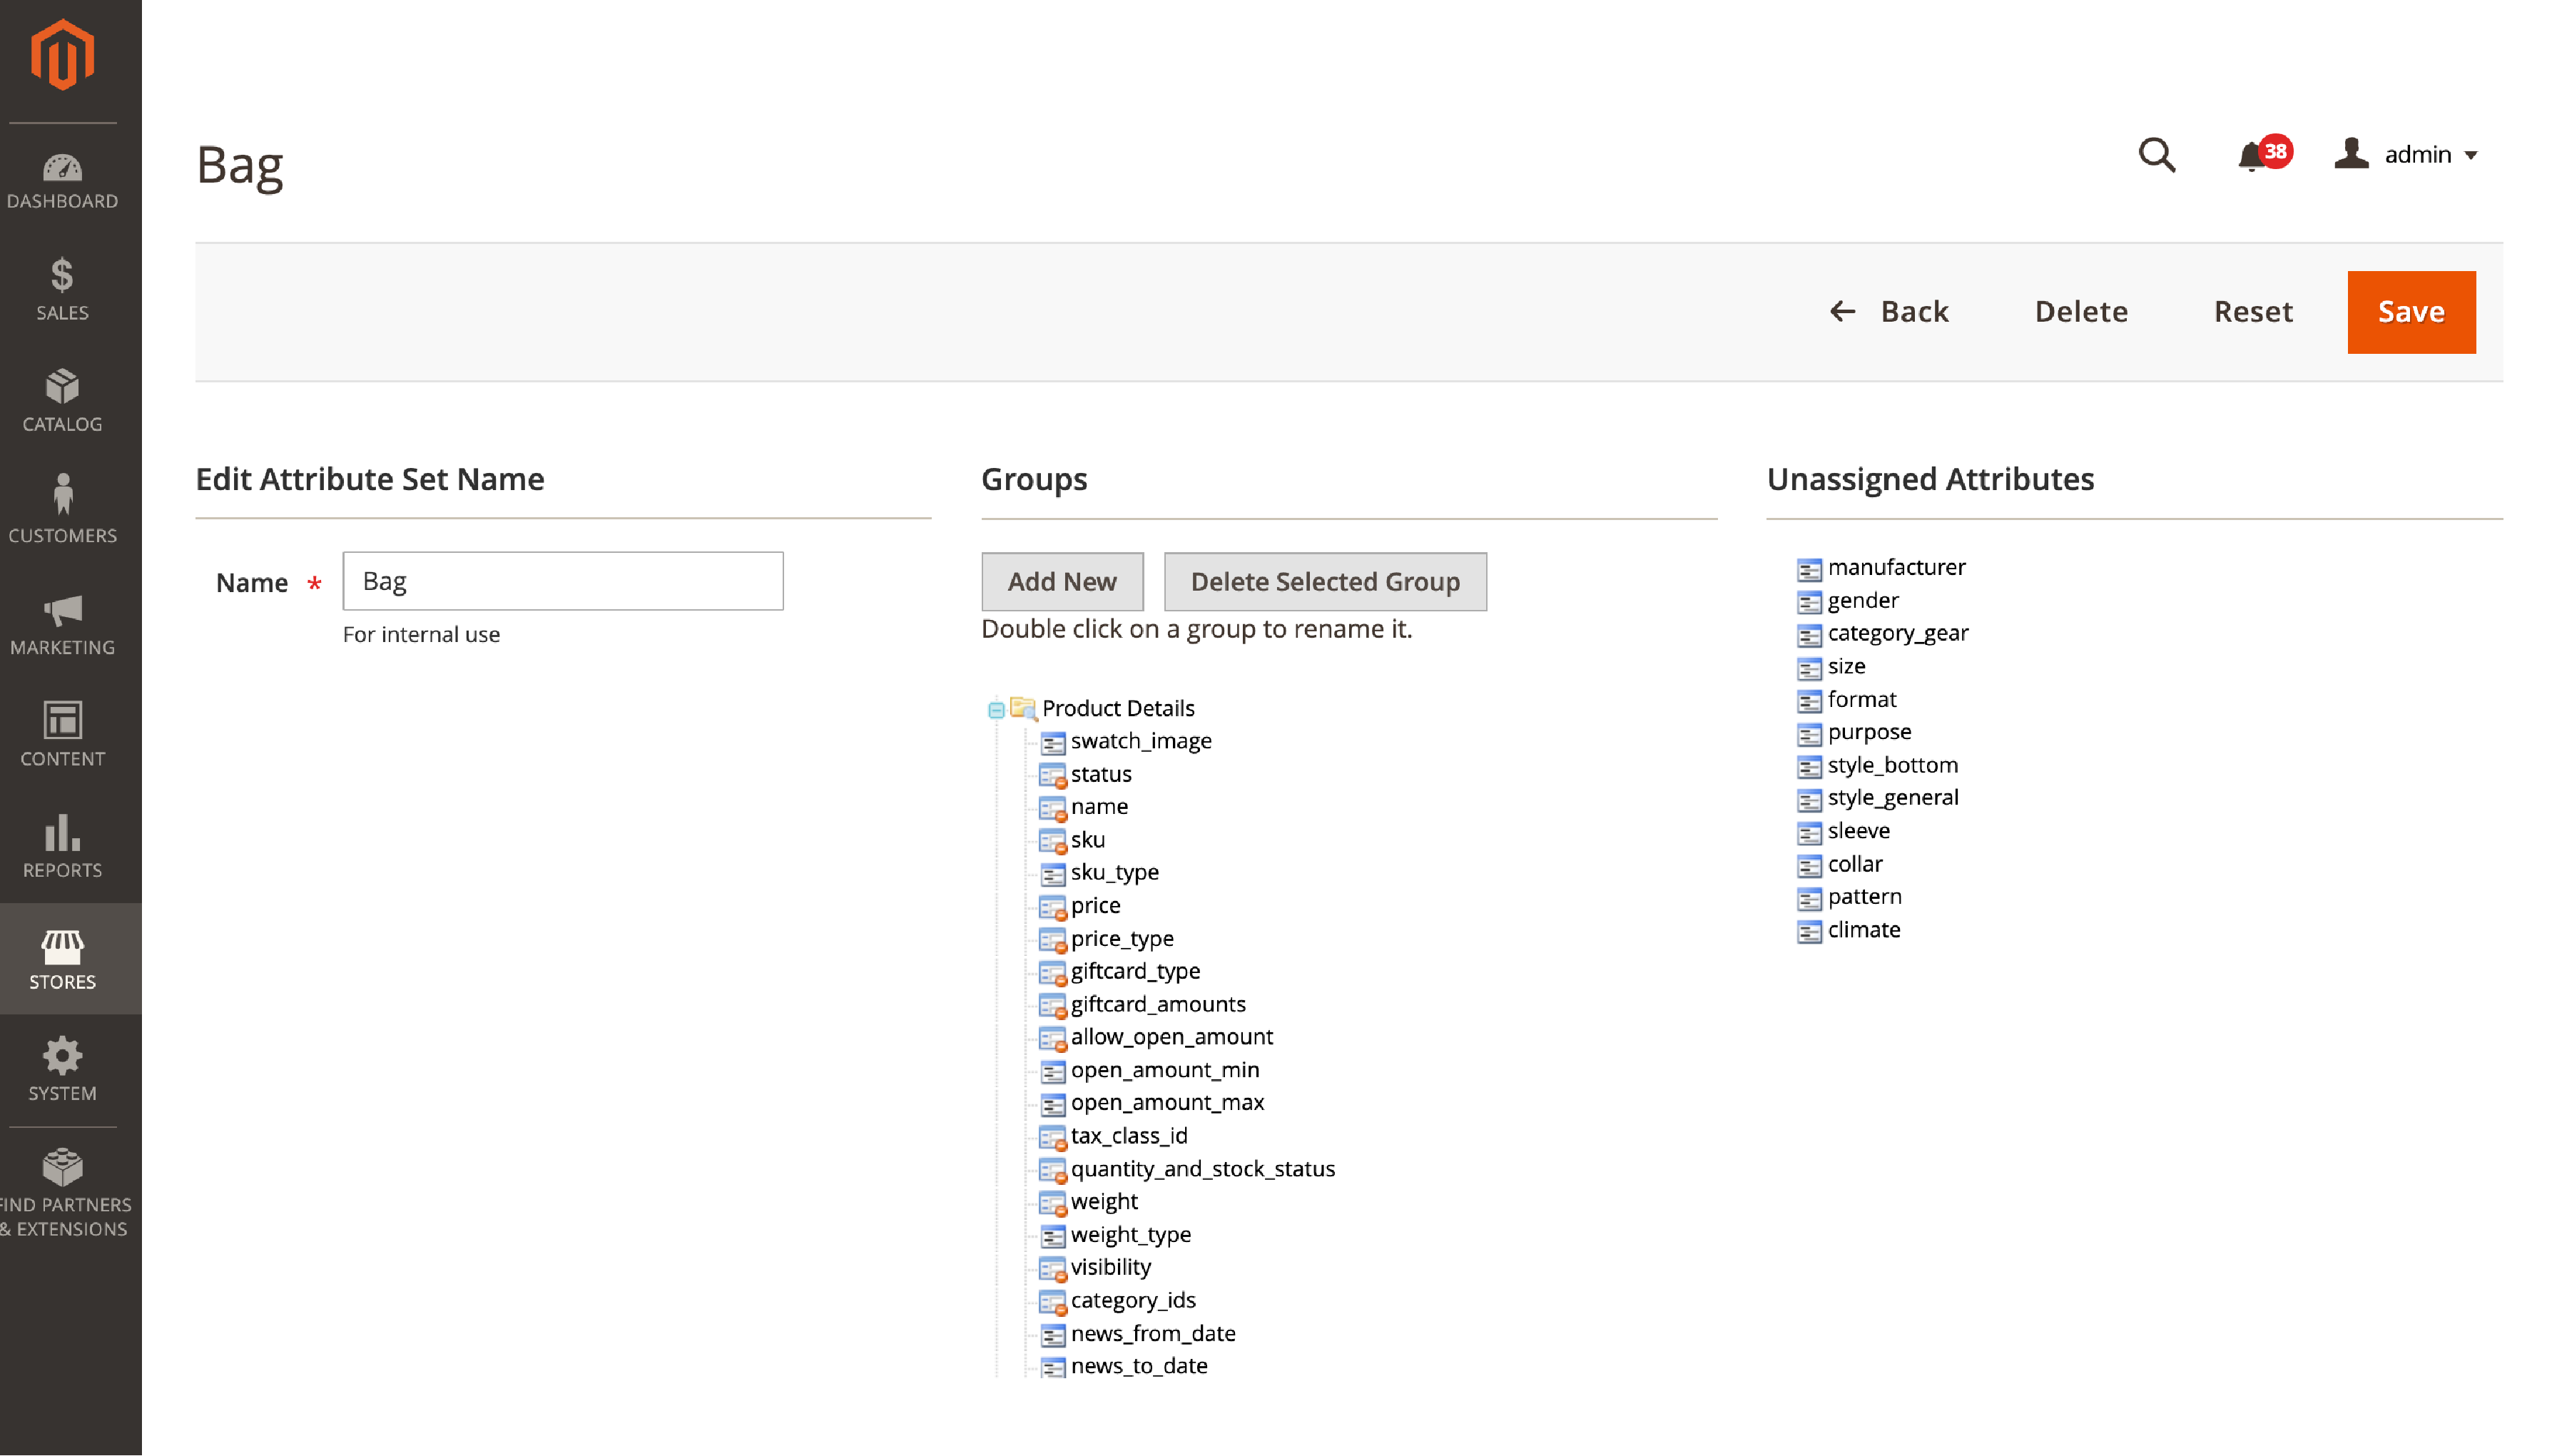
- Drag and drop the desired attributes from the “Unassigned Attributes” section into the appropriate group. Reorder attributes within a group by dragging and dropping them to change their position.
- Click the “Save” button at the top of the page to save your changes.
Tips For Creating Product Attributes
1. Consistent Attribute Naming Conventions
Maintain consistent attribute-naming conventions throughout your catalog. Use clear and descriptive names that accurately represent the attribute’s property. Avoid abbreviations, complex terms, or industry-specific jargon. Consistency in naming conventions facilitates efficient catalog management and helps customers easily find the products they are looking for.
2. Consider the Purpose and Usage of Attributes
Before creating an attribute, carefully consider its purpose and how it will be used in your store. Evaluate whether the attribute is essential for product filtering, sorting, or comparison. Think about the type of input required and how it will impact the user experience. By planning attribute usage, you can minimize unnecessary attributes, improve store performance, and enhance the customer journey.

3. Regularly Remove Unused Attributes
Periodically review your product attributes and remove any that are no longer needed. Removing unused attributes helps maintain an organized and streamlined product catalog, reducing clutter and improving navigation for store owners and customers alike. It also contributes to overall store performance by reducing the amount of data that needs to be processed.
4. Simplify product variations
Instead of creating separate attributes for each variation, use custom options and complex product configurations. Group similar products together using different templates or attribute sets.
5. Manage non-commerce attributes externally
Consider using an external Product Management System (PMS) for non-commerce-related attributes.
Wrap Up
By following the step-by-step process outlined in this blog post, you now have the necessary knowledge to create new product attributes in Magento. Custom attributes enable you to add unique and relevant information to your products, improving the searchability and presentation of your online store. Whether you need to create system attributes for essential product information or custom attributes to highlight specific product features, Magento provides a flexible and powerful platform for attribute management.
See More: