Magento 2 supports merchants in creating and hosting a variety of complex products. Configurable products are often the first choice for creating multi-item products, but here is another option you should consider. Magento 2 bundle products are intended to provide customers with increased creativity and freedom. They can create their own item sets from the available options with this product type.
This guide will show you how to create bundle products and add them into the Magento 2 catalog. Let’s get started.
Contents
What Is A Bundle Product In Magento 2?
Within the Magento setup, a bundle product is a multi-item, customizable product. The item in a bundle can either be a simple or virtual product.
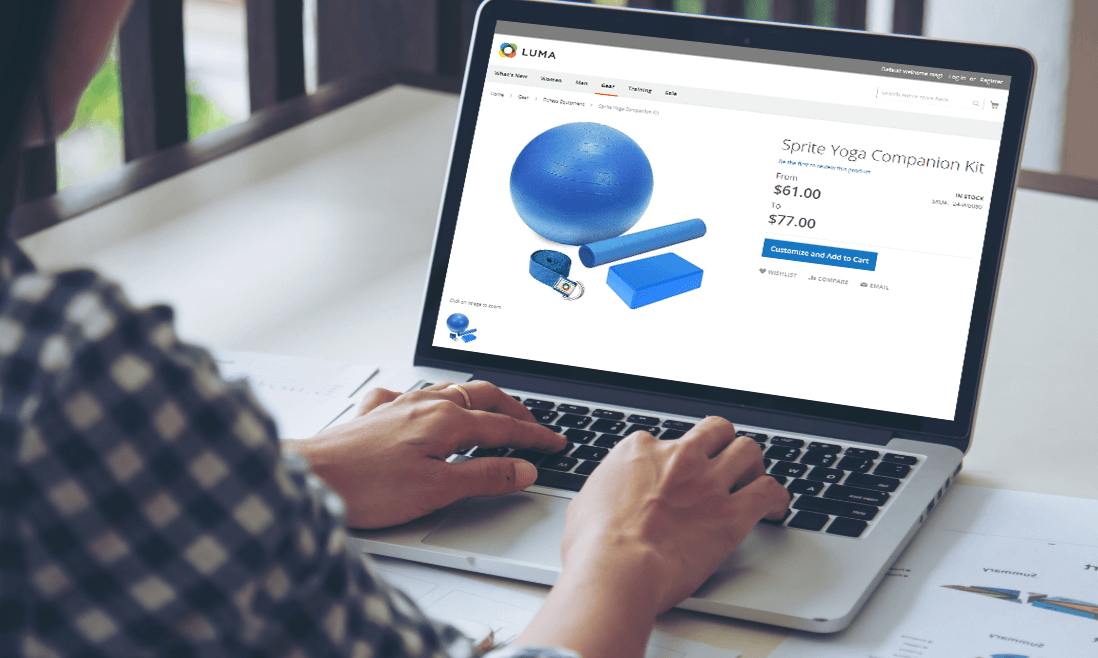
When the customer clicks Customize or Add to Cart, the options for the bundle appear. Because the products in the bundle differ, the SKU, Price, and Weight can be set to the following value:
- Dynamic
- Fixed
Noteworthy: In the case of dynamic pricing, the Minimum Advertised Price (MAP) is not a possible option for Bundle products.
Bundle vs. Grouped vs. Configurable Product in Magento 2
You might get confused about these three product types in Magento. Let’s clear the air on that!
What is the difference between them, and which type best suits your marketing objectives?
See the below comparison:
- A Bundle product is sold as a single product that can be customized to your specifications. Customers can choose accessories to go with the main product or combine multiple products to form one product through bundling.
- A Grouped product is made up of simple standalone products that can be customized in a limited way (for example, quantity) and can be purchased separately (e.g., a knife set with different sizes).
- A Configurable product is a single item with drop-down lists of options for each variation. Each option is a separate simple product with a unique SKU, allowing inventory to be tracked for each product variation.
So bundle is excellent for customers to make their own orders with compartmentalized items. Grouped products are perfect with a low-custom range. And the configurable products can be used to sell and track variants of the parent products closely.
Why Use Bundle Product in Magento 2?
Assume you sell a professional camera. These products are frequently sold in bundles, allowing customers to choose from a variety of options such as memory, lenses, cases, tripods, filters, and so on.
Similarly, you can apply the logic to products like computers or laptops. Customers choose their computers primarily based on the processor, RAM, hard drive, and other parts that influence their overall productivity, so as similar as laptops of the same series may appear on the outside, the parts that they consist of may vary greatly. These options are represented by product groups from which the user can choose.
How to Create A Bundle Product In Magento 2
Step 1: Pick out the product type
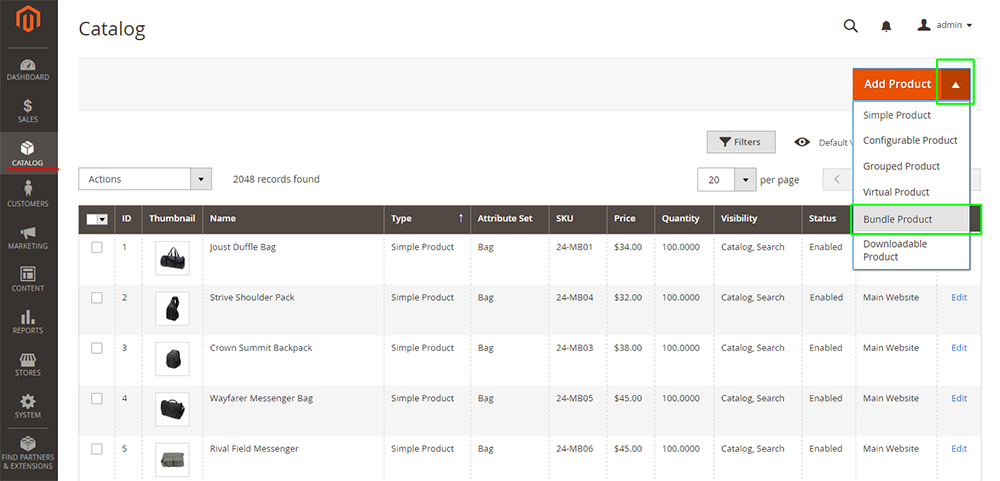
Firstly, in the Magento backend, navigate to Catalog > Products.
Then, click on the triangle symbol next to Add Product button. Here, click on Bundle Product.

Step 2: Select the attribute set
On the New Product page, choose the attribute set you want for the product from the drop-down field.
If there are many attribute sets to choose from, you can enter the template’s name into the search bar accordingly.
Once you choose the set, the page will self-update to adapt to the change.

Step 3: Finalize the required settings

Here, you need to finish all the required settings. You can notice them easily with a red asterisk by the name. Let’s go through them quickly.
1. Enter your Product Name.
2. Configure the SKU
- Use the default by the product name.
- Enter your preferred SKU
3. Configure Dynamic SKU or child products
- Yes: Assign Dynamic SKU automatically by adding a suffix to the SKU of the parent product. (Recommend)
- No: Set the Dynamic SKU manually.
4. Set the price for the bundle. Configure Dynamic Price.
- Yes: The bundle price will be the sum of the child products the customer picks.
- No: Charge a fixed price for the bundle.
5. Set Enable Product to No to continue to edit the bundle.
6. Click Save.
After that, you can choose the store view for the product to appear and be visible to customers.
Step 4: Complete the basic settings
You don’t have to fulfill everything on this list. However, we strongly advise you to consider doing them to demonstrate the products further and encourage customers to purchase.
1. Set the Tax Class
- If your bundle has a fixed price, you can classify the whole product tax as Taxable Goods or None.
- On the other hand, with Dynamic Pricing, Magento will calculate the tax for the bundle as the total of each child product individual’s tax.
2. You can’t set the Quantity for the bundle product. Magento will set this based on the bundle’s item.
3. On the contrary, you can set the Stock Status. The default value is in stock.
4. With Weight settings, choose Dynamic Weight to calculate the total by customer’s choices. Turn this toggle to No if you want to set a fixed number for the whole bundle.
5. Pick out the Categories for your bundle. You can create a new category on the spot with the same name button.
6. Set Visibility for your product. There are 4 options for you to choose from:
- Not Visible Individually: The customer can view/search for this bundle.
- Catalog: The product is visible on the catalog page.
- Search: The product is visible on the search result page.
- Catalog, Search: Both of the above pages are fair game.
7. Put the products in the New List category by Set Product as New From…To: You can pick out the time range from the calendar.
8. Show the origin of the product with the Country of Manufacture: Pick it out of the drop-down box..

Step 5: Create a bundle product in Magento 2 by adding child items
It’s time to put in all the options for customers to build their own products. We will go through this process top-down, still in the create new product page:
1. Determine shipment of the product: You can choose to ship the bundle together or separately. Remember, you can only ship the bundle together if all items have the same source.

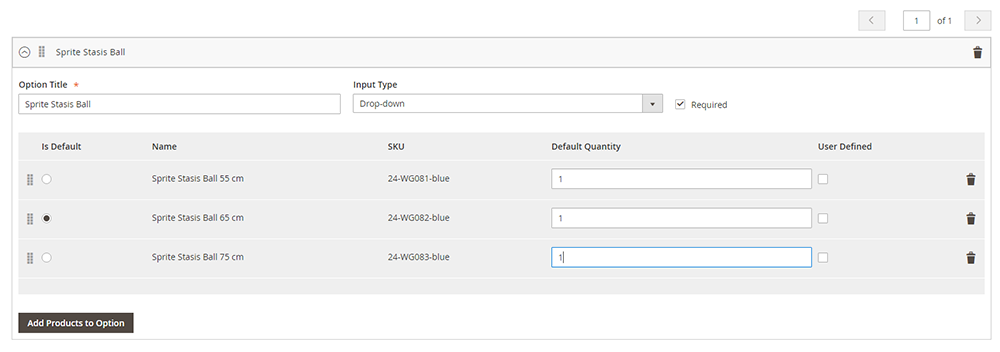
2. Click on Add Option and fill out the table accordingly:
- Fill in the Option Title.
- Choose Input Type. Your options include:
Drop-downRadio buttonsCheckboxMultiple Select
- If this option is a must for customers to customize their bundle, mark the field with the Required checkbox.

- Left-click on Add Products to Option and tick on the checkbox of each product that you want. Simply use the list filters and pagination controls to find your product faster.
- Then, click on Add Selected Products.
- With the quantity of the item, you can set a fixed number or use User Defined for the customers to have their input on this field. Here is an example:

- Rep these steps for each item you wish to include in the bundle.
- You can rearrange the position item by clicking on the Move icon and then dragging them.
The order of items in an exported bundle product’s data can also be changed and then reimported into the catalog. See Importing Bundle Products for more information.
- To erase any item from the product, click on the Delete icon.
- Once complete, click Save.
Step 6: Complete the products’ information
You’re almost done! Here are a few more pieces of information that you can fill in to make your product more eye-catching to the customers. Scroll down and fill in the blanks in the following sections as needed:
- Content
- Images and Videos
- Search Engine Optimization
- Related Products, Up-Sells, and Cross-Sells
- Customizable Options
- Products in Websites
- Design
- Gift Options
Step 7: Publish the product
Your job here is complete! The bundle product is ready to launch by switching the Enable Product toggle to Yes.
Key Takeaways
We’ve just gone through the process of creating a bundle product in Magento 2. Here are a few keynotes for you to practice:
- Customers can create their own custom bundle products.
- Bundle items can be simple or virtual products that do not have any custom options.
- Price Range or As Low As can be selected as the Price View.
- SKU and weight can be static or dynamic.
- The quantity can be predefined or user-defined. However, do not give the checkbox or multiple-select input types the User Defined property.
- Items in a bundle can be shipped together or separately.
We love to share these easy-to-follow guides with you! If you need help with your e-commerce store, our support team is always more than happy to help. Drop us a message at [email protected].
Tigren has over 10 years of experience developing and deploying e-commerce solutions on various platforms. Here at Tigren, we provide not the cheapest solution but the most valuable one at an affordable price.

